We transform the movie of an actor into an animated drawing using the texture we prefer: pencil, paint, markers, we can make it with GIMP. Then, thanks to Kdenlive, the texture can be applied to the actor’s silhouette.
When making a music video, you often look for less obvious effects. The most classic example is drawings: transforming the singer (or any other subject) into a drawing, possibly animated. One option is to make a real cartoon by drawing the character by hand and animating it. But it is obviously uncomfortable, because to be able to have a realistic result you have to be quite good at drawing and create many frames in order to prevent the animation from jerking. The simplest thing is to turn a movie into a drawing, just as you can do it with a simple photograph. The technique to be exploited is matte painting, but on the contrary: the classic matte painting provides that a background is added in superimposition to the images filmed thanks to a silhouette (usually obtained on the basis of its brightness, in GIMP you can create level masks editing them manually). In this case, on the other hand, you want to make a certain texture visible using the film made with an actor as a layer mask. The texture must represent the classic filling of the drawings: it can be a rectangle colored with pencils, with tempera, markers, chalk, or spray paint. Of course, these textures can also be digitally created with GIMP, even using unusual motifs (tree bark or stone). For example, you can draw spots on the image, as if you were spraying spray paint, and then only make the silhouette of the actor visible, to give the illusion that the actor himself was actually drawn with the spray paint. The trick we will use is to draw the texture with GIMP and then create multiple versions, to be joined as frames in a sequence. This will allow us to have a variable and not fixed texture, which otherwise might seem a bit forced as a thing. In fact, the more the texture changes, the more realistic the design will look, because when making a cartoon by hand coloring it is inevitable that the texture will always be different in each frame. Then, with Kdenlive, you can take a green screen clip of the actor starring in the movie and remove the green background, using the classic chromatic key. Kdenlive then offers the possibility of creating matte painting with a transition, making the texture visible, on a background, only through the silhouette of the actor cleaned from the green cloth. The matte painting used in this way is very efficient even if you are using it as the texture of the normal graphite pencil, because you can take advantage of the whole brightness range of the shots, and therefore make the graphite appear darker and lighter in different areas of the image just like when making a real pencil drawing. To achieve this result, you do not need to binarize the actor’s video (thus making it appear only black or white), but you can play with contrast and brightness to get all the gray scale you want, just like in the GIMP level masks. As always, you can see the example video at the following address: https://www.youtube.com/watch?v=natRNx5_nJE
 The silhouette of the actor is rendered with the texture
 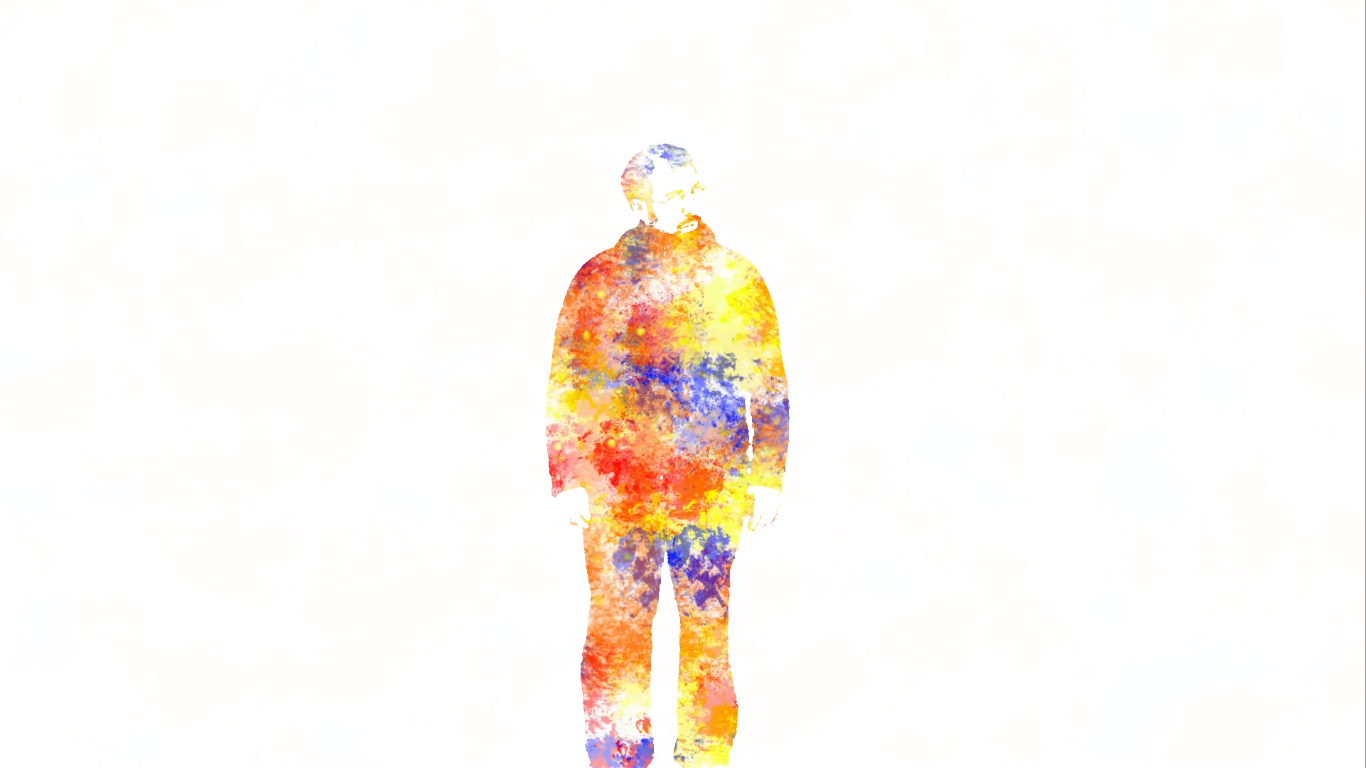 The texture changes over time
 How to illuminate the green screen
This effect is played with lights and shadows: since we generally work with the image in negative, everything that is highlighted during the shooting will disappear, while what is in shadow will be represented with the texture that we have prepared. This means that to clearly distinguish the details of the actor it is advisable to use a grazing light. The ideal is, for example, to illuminate the face well but not the eyes, which will therefore become visible after applying the effect. To prevent the folds of the green cloth from being too prominent, it can be illuminated with an additional lamp that hits it directly and from above, to erase any shadows cast on it.
Prepare the texture
With GIMP you can design your own texture
 1 NEW IMAGE – To begin to create the texture of our “design”, we must turn to GIMP. We create a new image with dimensions equal to those of the movie we want to make (e.g. 1920×1080).
 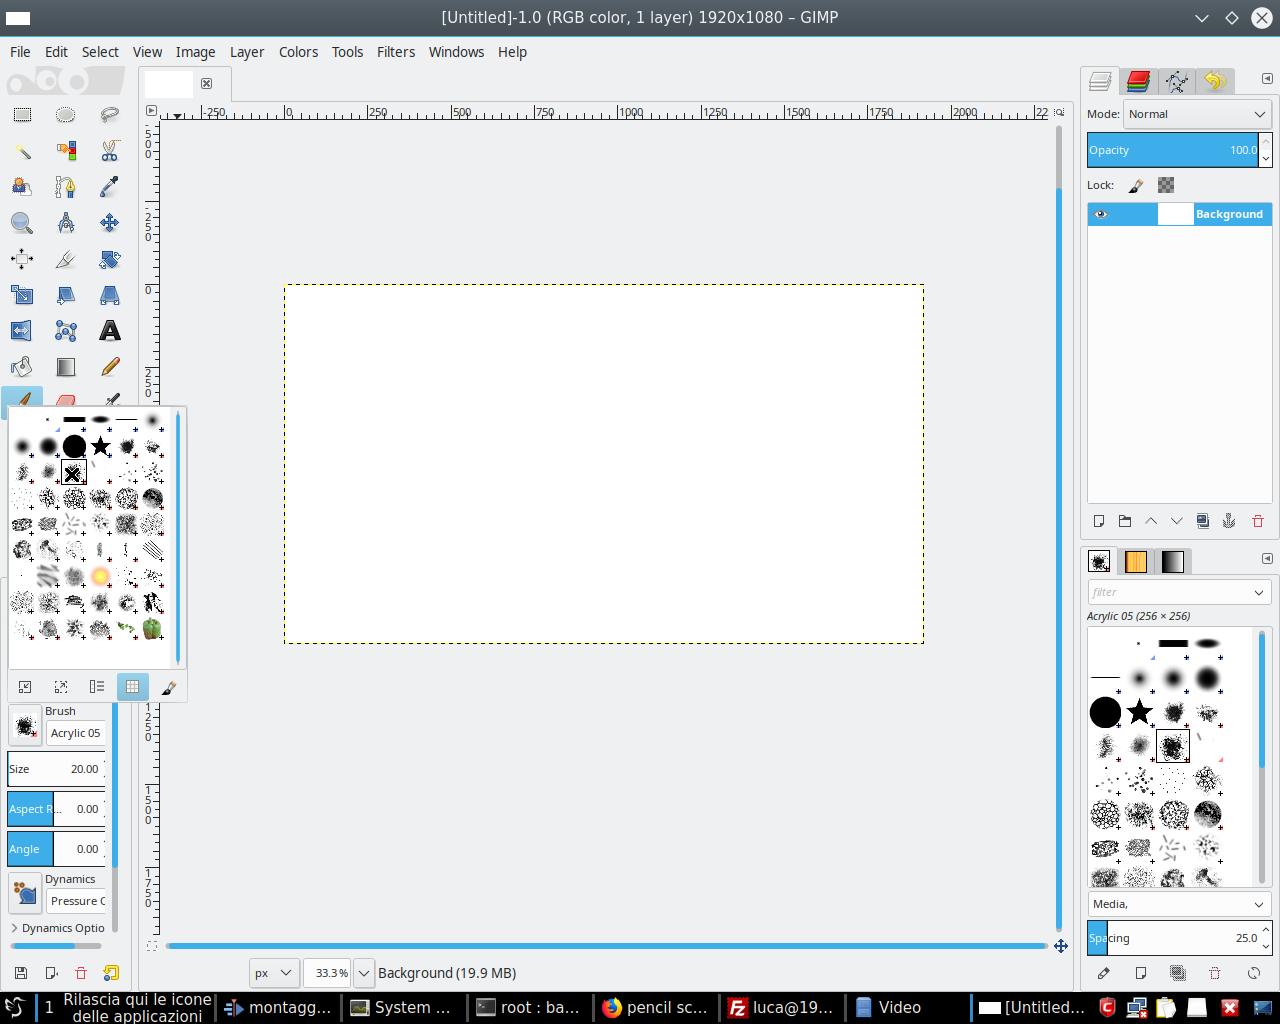 2 WITH THE BRUSH – Now we select the brush, choosing a shape of the Acrylic type. These resemble brush strokes. Obviously, other effects can be used (chalk, charcoal, sponge…). The size must be sufficient to show the shape.
 Animate the texture
A realistic texture for an animated drawing must change constantly
 1 MANY STAINS – Select the foreground color for the brush and start painting a series of spots on the image. You have to proceed until the entire surface is covered, obviously also changing color.
  2 WITH OTHER FORMS– You can also change the shape of the brush, to make the image more irregular. In particular, the Debris shape is useful for drawing paint splashes. Of course you can also use other textures: by drawing in lines you pretend a marker.
  3 SOME CHANGES – Once the texture image is saved in a PNG file, we can copy it four times (with names such as texture1, texture2, etc.) and make minimal changes in each. The simplest thing is to crop the various images in various ways.
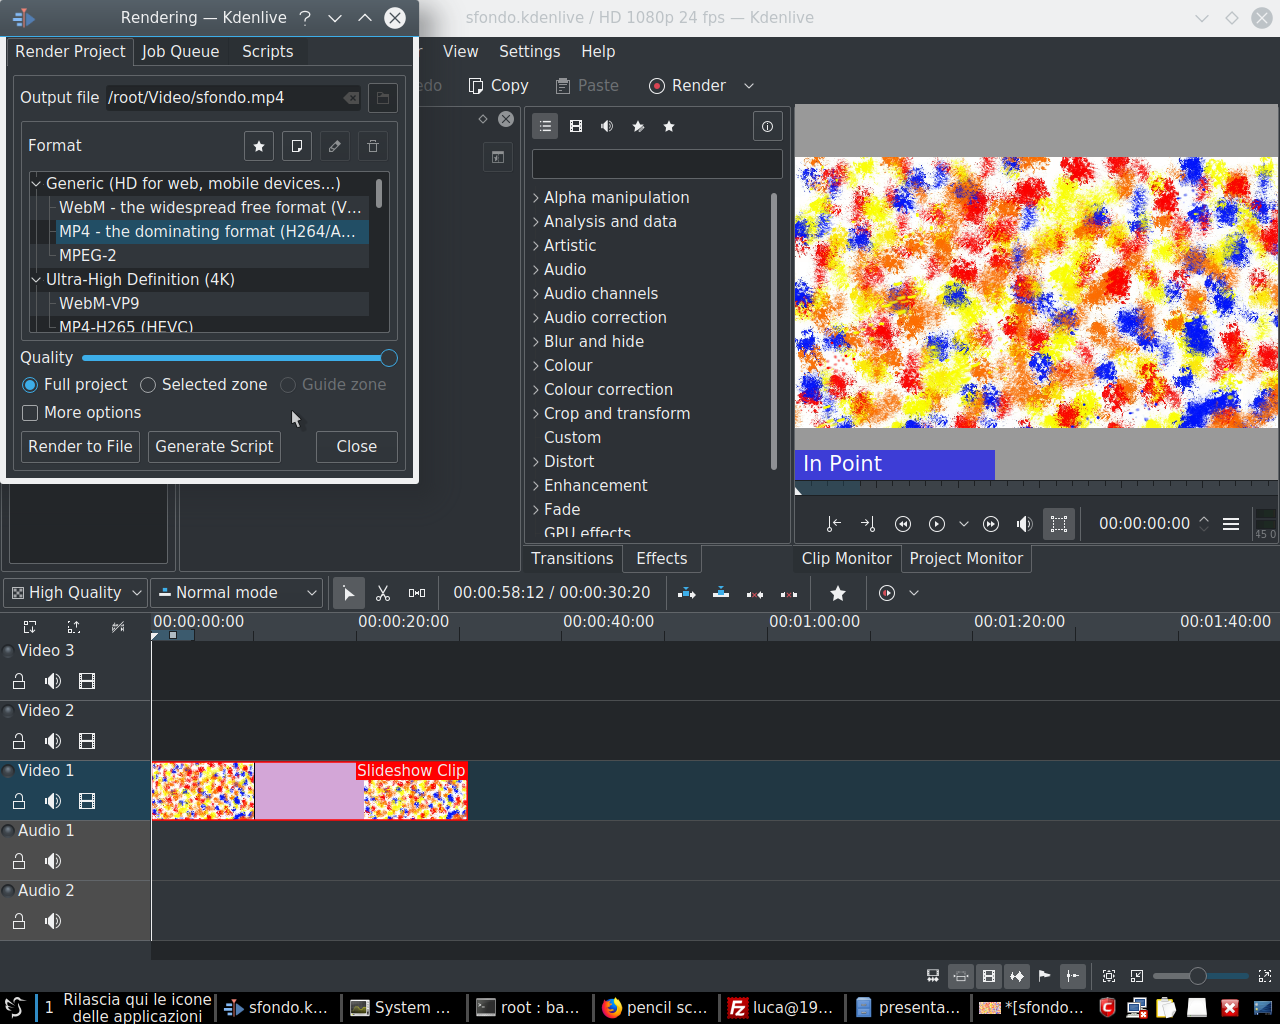
  4 CLIP SLIDESHOW – Open Kdenlive we can create a slideshow by clicking on Project / Add presentation clip . You have to choose the folder where the various texture files have been placed. We can set a duration of 15 first courses and a fade of 5 first courses.
 The various clips in the right order
The actor’s clip must be positioned above the one with the texture
 1 THE CLIP IN LOOP – You must enable the loop , so when you insert the clip into the timeline you can extend it as much as you want. It is possible to create a long enough clip and export it, to then insert it in a new project in which we will really create the effect.
  2 ALL CLIPS – In the final project we need the presentation clip (possibly already exported to save time), the one shot with the actor in front of the green screen, and a white color clip.
  3 CUT THE VIDEO – First it fits into the timeline, in the top track (usually the Movie3 ), the clip with the actor, cutting it when necessary. The track Video1 (the lower one) must contain the white color clip.
  4 HERE IS THE TEXTURE – In the track Video2 , the intermediate one, you need to insert the texture clip. All clips must be sized so as to have the same length as the clip containing the actor on the green background.
 Cut out the texture
We use the clip with the actor as a layer mask for the texture
 1 CHROMATIC KEY – The green background can be removed from the clip containing the actor using the effect Chromatic key , and delete other unnecessary parts using the rotoscoping , drawing an outline for the actor.
  2 A NEW TRACK – Now you need to add a video track between the Movie3 and the Video2 , that is, under the actor’s clip. The new track will be called Movie4 . In fact, we must replace the background on which the actor is located with a uniform one.
  3 THE COMPOSITION – For this reason we insert the white color clip into the newly created track. The actor will then appear on the white background. You then need to connect the two clips (track Movie3 is Movie4 ) with a type transition Composite .
  4 MATTE COMPOSITING – Between tracks Movie4 is Video2 you have to enter a transition of type Matte . This allows to make visible, of our texture, only the lighter areas of the image (which for now has a white background and the actor).
  5 LIGHT IN NEGATIVE – To make visible only the actor just add, both to the clip of the track Movie4 is Movie3 the effect Invert , which makes the image a negative. Now the silhouette of the actor appears drawn with the texture we had created.
 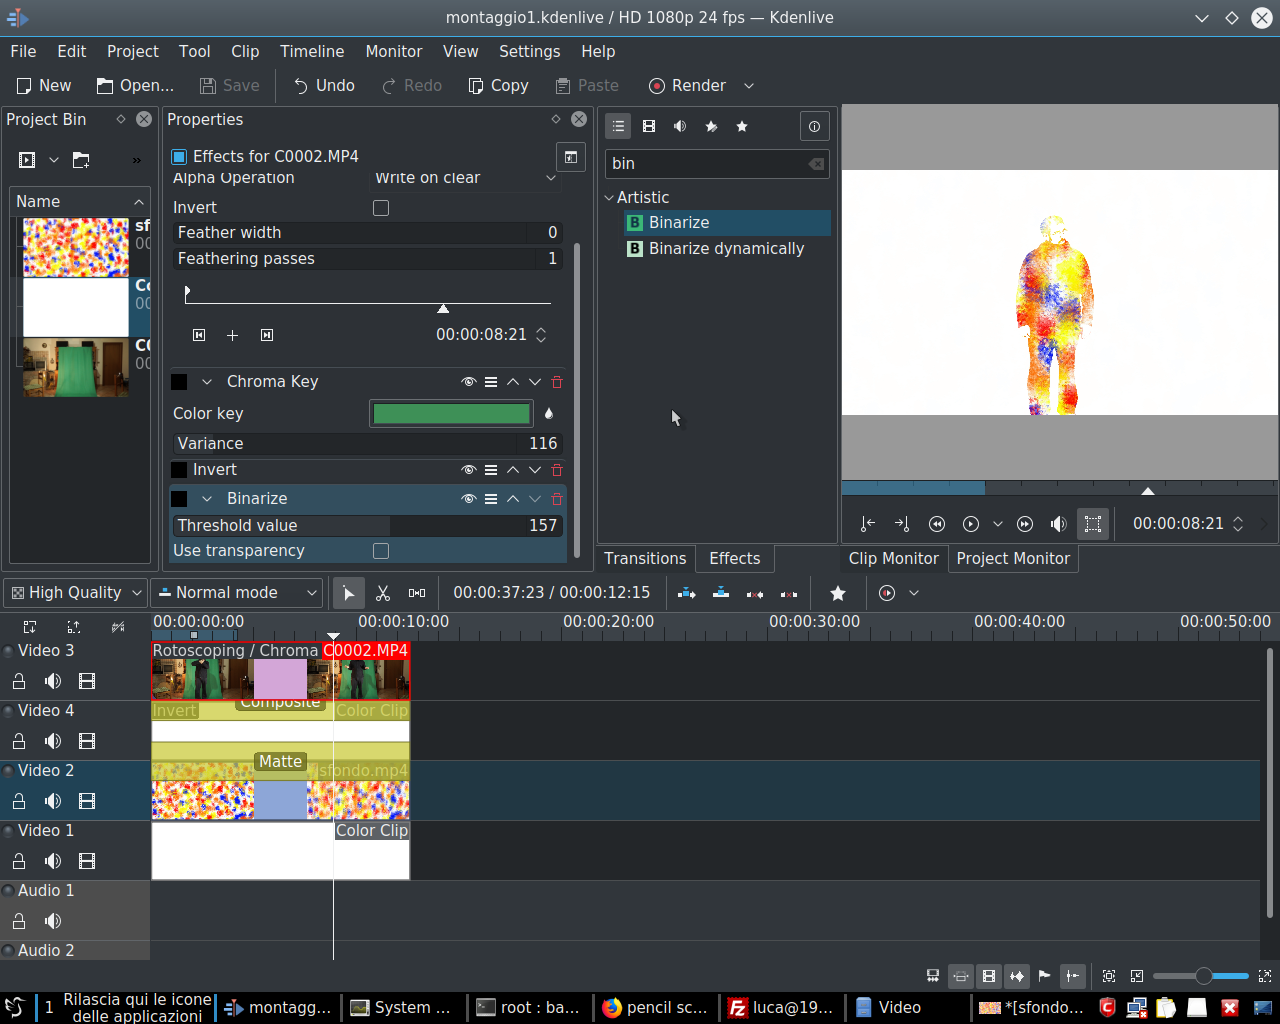 6 BLACK AND WHITE – To better adjust the rendering of the effect, you can adjust the contrast or, to delineate the features (especially of the face), use the effect on the actor’s clip binarize , setting a threshold that makes important details clearly visible.

