With Kdenlive we can make a third eye appear on an actor’s forehead, using the two-dimensional tracking algorithm integrated into the program. And with a little trick we can perfectly control the position and alignment of the eye.
One of the most common and difficult things to want to insert in your own video is a modification to an actor’s body, typically an object to be pasted. The classic example is a third eye on the forehead, but often we also want to represent tattoos or holograms. The question is: how can you pretend the appearance of an eye on the forehead? We can do it with Kdenlive, and all we need are two video clips. One is obviously the one with a close-up of the object to be glued (in the case, the eye), and the other is the one with the actual scene, that is, the actor who plays. The basic idea is simple, just glue the clip with the eye over the other using rotoscope and chromatic key to cut it as much as possible and a composite transition to resize it and position it correctly on the actor’s forehead. But there is a problem: the actor moves, it would be unnatural to make him stand still only for this effect. So the eye must follow the movement of the actor’s forehead. There are basically two options for doing this: one is to move the glued eye frame by frame, but it is unnerving and boring. The other is to use Kdenlive’s tracking system to follow the actor’s movement. This is obviously the simplest and most effective solution. First, fix a point on the actor’s forehead, for example a square of black adhesive tape, and shoot in this way. The result is a video clip with a very clear point to follow. When importing the clip into Kdenlive you can use the effect Automatic mask to track the point. We don’t really need the effect, and we can also disable it, but it is essential because it takes care of tracking our point and memorizing the information on the movement also for the effects that we will apply later. Now, the apparently simplest solution could be to put a transition directly between the clip with the actor and the one with the eye, making them follow the tracking data. But this would not allow to control well the size and alignment of the eye. The solution is to create a transparent intermediate layer, a green color clip to which a chroma key can be applied works well. The transition Affine is positioned between the actor’s clip and the one that is transparent, applying the tracking data to the transition itself. Thus, it is the transparent level that moves following the actor’s forehead. Then, a transition applies Composite between the clip with the eye and the transparent one, using this transition to adjust the size and position of the eye. The result is that the eye has exactly the dimensions we want and is perfectly positioned where it must be, following the tracking point but without the need to have its own position, as it may not be perfectly centered. As always, you can see the example video at the following address: https://www.youtube.com/watch?v=LqwJr60_g0k
 The eye we added is perfectly on the actor’s forehead
 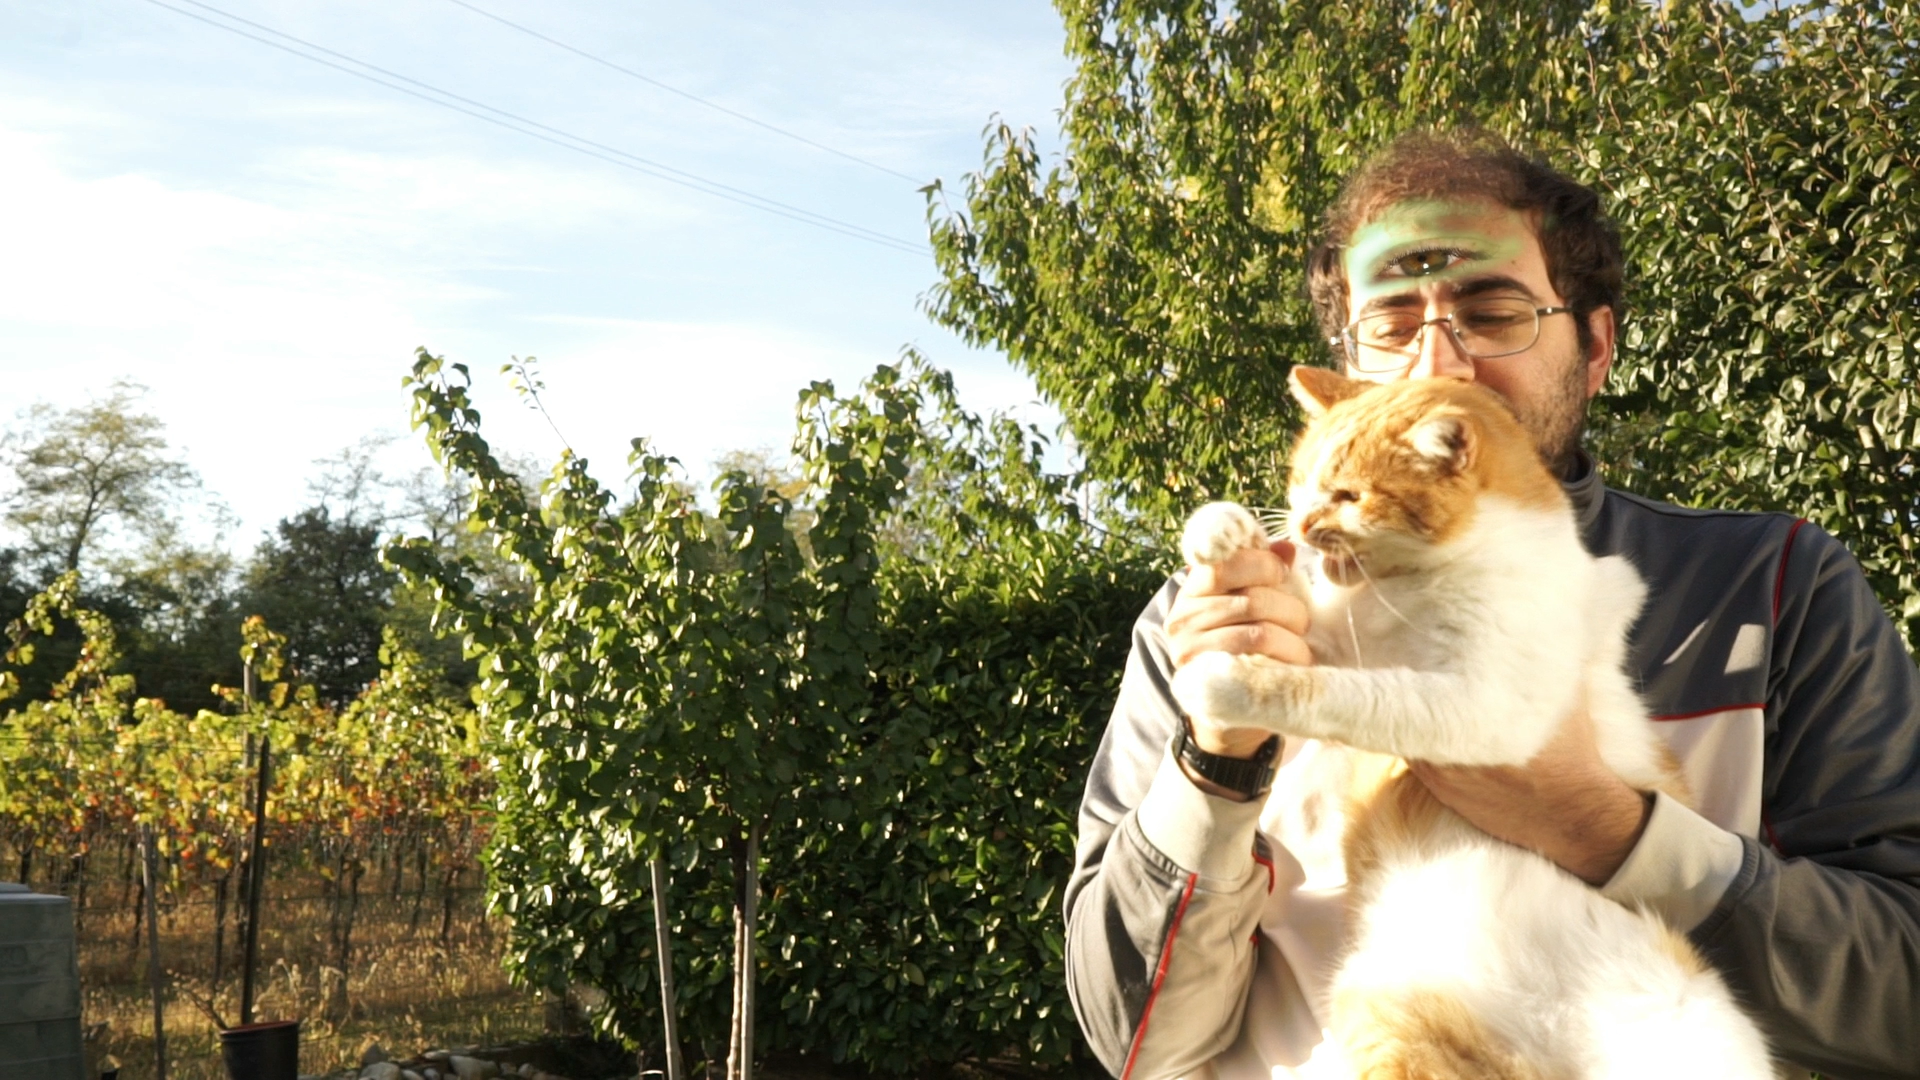 The eye moves following the forehead, and we manually added the rotation
 How to shoot the first floor
For the first floor of the eye, we need a particular setting. A telephoto lens can certainly be useful, but not too high, from 50 to 85mm. By using an average closed aperture, generally F / 8, you can get the whole eye in focus, blurring the rest. The lighting, then, must try to erase the shadows as much as possible, otherwise you would notice the presence of the nose and forehead too easily: we must make the skin disappear using a chromatic key, therefore ideally the skin should have the same color in each point. To do this, just use two diffused lights that point to the eye from opposite directions, so as to cancel each other’s shadow.
The basic track
Work begins on the clip containing the actor
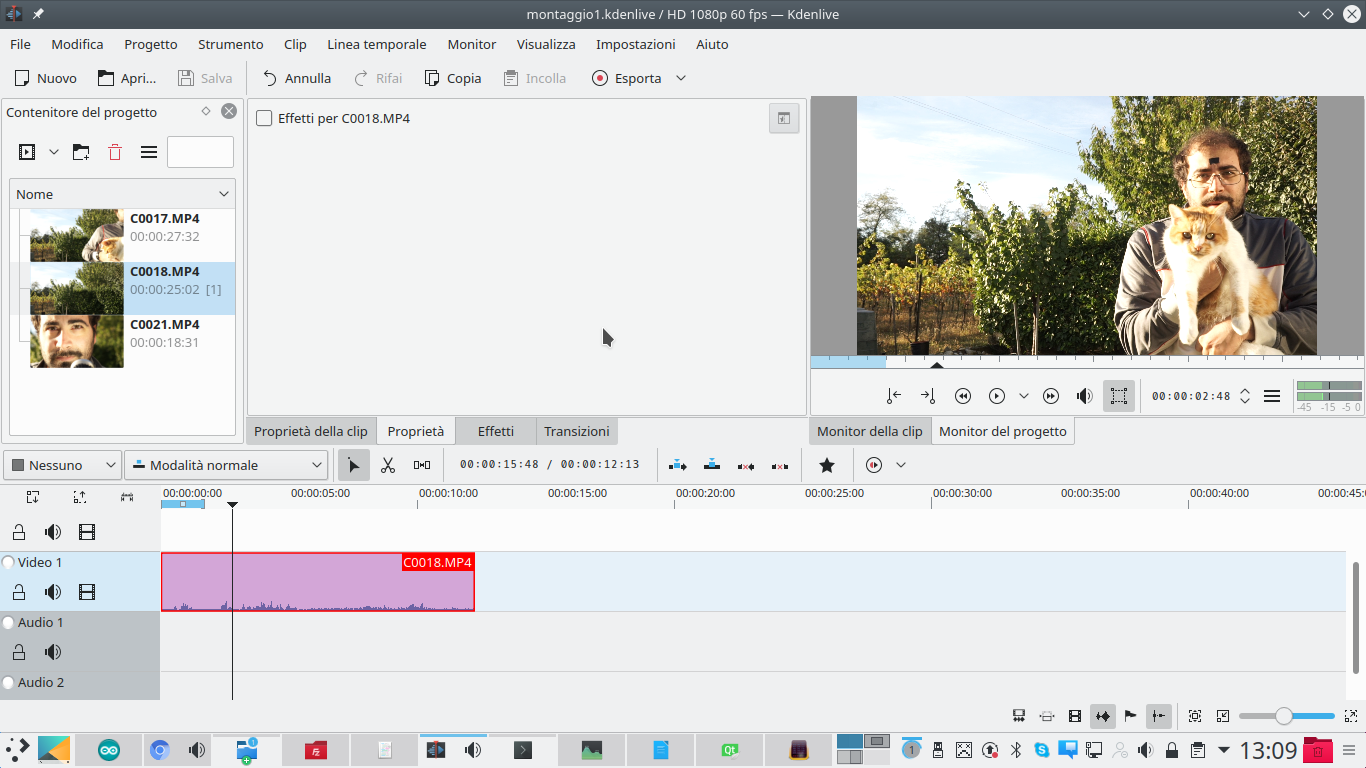 1 START THE ACTOR – To begin with, the clips with the actor and the one with the close-up of his eye are loaded into Kdenlive. The actor’s clip is put on the track Video1 , the bottom one of the video tracks.
  2 A MASK – Let’s add the effect to the clip Automatic mask by selecting with the red rectangle in the Project monitor an area that contains the tracking point. The rectangle must not be too large, otherwise there is a risk that the algorithm will get confused.
 Track
We calculate the position of the tracking point and store the data
 1 POINT ANALYSIS – In effect Automatic mask button is located Analyze . By pressing it, Kdenlive tries to follow the tracking point and then memorizes the movements. The analysis can be repeated several times by changing the red rectangle, if you want to improve the results.
  2 HERE IS TRACKING– When tracking for the second time, just click on add to the dialog box that appears, to add the new data. Once the operation is finished, just disable (do not cancel) the effect to prevent the mask from appearing.
 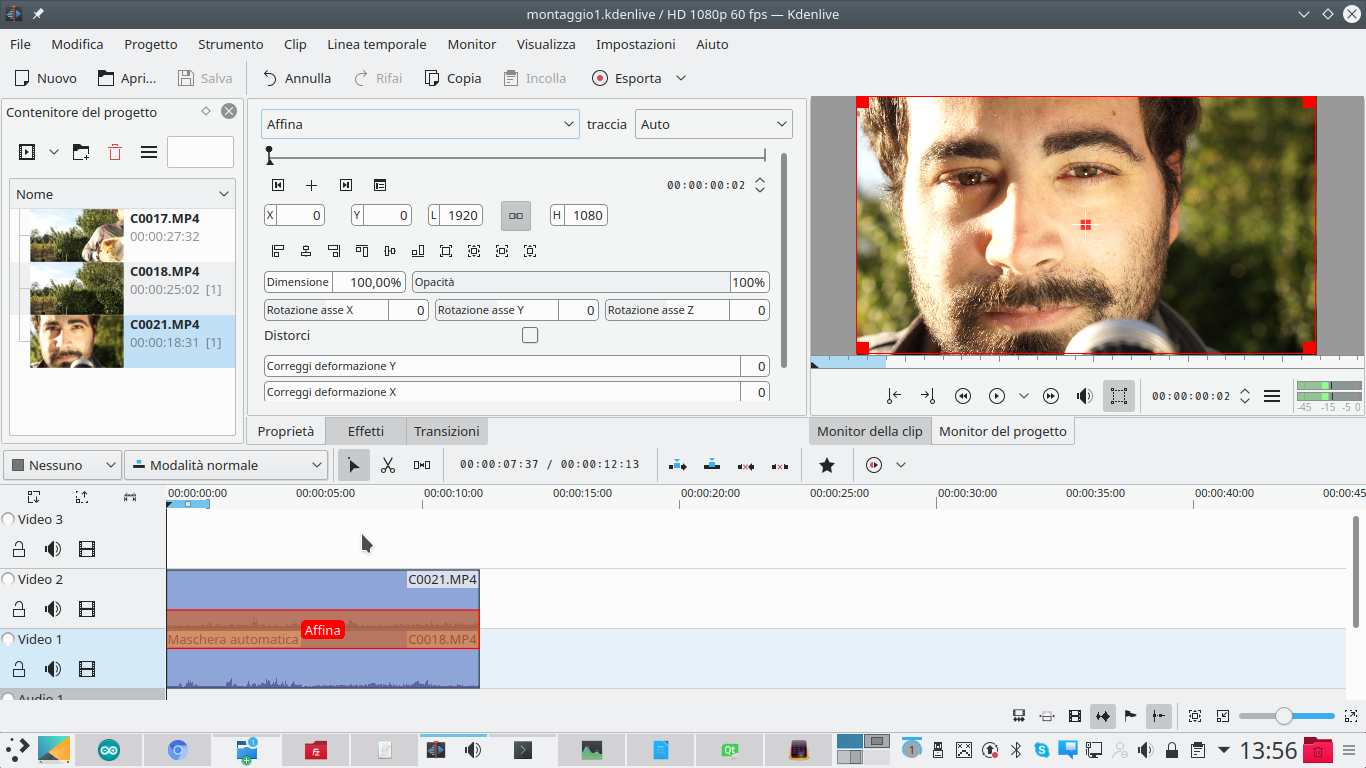 3 RELATED TRANSITION – The mask is not needed because we are only interested in the position data, which we will apply to a transition. And in fact now we add in the track Video2 the clip with the foreground of the eye, inserting a transition between the tracks Affine .
  4 THE ROTOSCOPING – To the clip containing the eye we must add a type effect Roto , drawing the outline of the eye as narrow as possible, to avoid including parts of the face that do not fit.
 Prepare the eye
We prepare the necessary to make the eye appear more
 1 ONLY THE EYE – To keep only the eye, making the skin that covers it disappear, just apply the effect to the clip Chromatic key . By selecting the skin color and an adequate variance, only the eye remains visible.
  2 SHADED EDGE – If the skin has more shades, multiple chromatic keys can be applied. In the end, let’s add one Alpha channel operation . The operation to be selected must be Soften , and the quantity must be set so as to have a slightly shaded edge.
  3 THE GREEN BACKGROUND – Now we can create a new monochrome clip, from the menu Project / Add color clip . The color to be selected can be any one, typically bright green because it gives a lot of contrast with the eyes.
  4 NEW POSITION – We move the clip with the foreground of the eye in the track Movie3 , the one above all the others, and we place the green clip in the track Video2 , the intermediate one that we have just released.
 Automatic positioning
We use tracking data to automatically place the eye on the forehead
 1 THE COMPOSITION – We place, between the clip of track Video3 and that of Video2, a transition of type Composite . Then, in the clip of the Video2 track, we add a type effect Chromatic key , setting the color to green to remove the background.
  2 THE KEY FRAME – Now we can finally go into transition Affine and select with the key Ctrl pressed the actor’s clip (the one in the Video1 track). Made this selection, click the transition menu and choose Import keyframes from clips .
 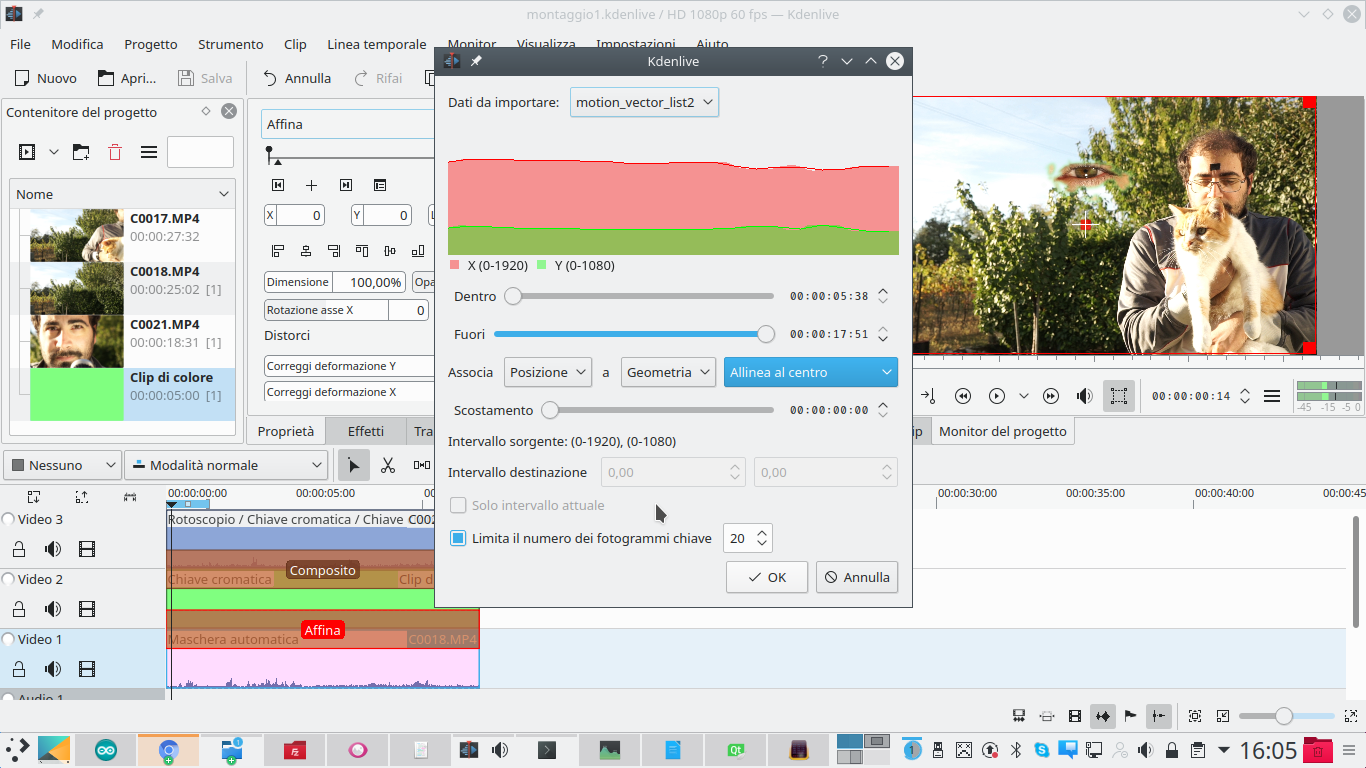 3 HERE IS TRACKING – The window that appears is the one that allows us to decide how to use tracking. First of all we choose the tracking data (if we have created several). Then we set up Align in the center , and a frame number of not less than 20 .
  4 STARTING POINT – Now it remains to correctly position the starting point of the eye: going into the transition Composite , drag the eye to position it where necessary, covering the actor’s tracking point.
  5 SMALL RETOUCHES – Going to see the transition Affine , in theory, the various key frames that perfectly follow the movement of the tracking point will have been created. If there are positions to adjust, it is still possible to do it manually, even by inserting new frames.
  6 THE RIGHT FORM – Checked the position of the eye, changing the Roto we can adjust the contour of the eye itself if necessary for the movements it makes (it must not come out of the actor’s forehead but cover the tracking point).

