Kdenlive is able to detect the movement of an object in a two-dimensional video: and we can take advantage of this function to avoid manually building all the key frames of a “composite” transition. Great for making gunshots or stains appear on a wall.
An action film needs, first of all, “action”, movement. Shooting should never be perfectly still, it is not advisable to use a tripod: to give a sense of action, it is better that there is a minimum flicker in the shots. This, of course, makes things more complicated with regards to applying effects in computer graphics, because even the objects that we overlay on the original video will have to follow the movement of the camera. Fortunately, Kdenlive has the tracking function, thanks to which it is possible to automatically analyze the movements of a tracking point, i.e. a small portion of the image. To demonstrate how it works, we decided to try making bullet holes appear in a wall. It all starts with a video clip that we will have to shoot, in which we see the wall with pieces of colored adhesive tape in correspondence with what will have to be the bullet holes. The effect must be added to this clip Automatic masking , which is usually used to encrypt people’s faces. This effect is able to analyze the movie and follow the movement of a point in the image. After analyzing the clip, the effect can also be hidden or removed. The next step is to overlap, with the usual transition Composite , an image of a bullet hole (which we can easily find on the internet) on the clip itself. Of course, the position and size of the hole will have to be set via a key frame. And instead of doing it manually, we can import keyframes from the original clip. In fact, when we had it analyzed by the effect Automatic masking , this recorded in the clip itself a series of key frames suitable for use with transitions Composite . If everything went well, scrolling through the project timeline we can see how the position and size of the bullet hole have automatically adapted to the movements of the camera. The image and video clips must have the same length, otherwise the key frames would be out of phase. Of course, the operation must be repeated for all the holes we want to make appear. In the same way, they can be superimposed on the tracking points of the portions of the wall, so as to reconstruct the wall itself as if the adhesive tape had never been applied. Superimposing the video of the wall with the bullet holes on that of the completely “clean” wall, and using the effect rotoscope to hide and make the holes appear at the right time, a very realistic result is obtained. To give a sense of what is happening, the audio effects are very important (in fact you have to insert the sound of a shot every time a new hole appears in the wall) and the editing with the other scenes of the final movie, which must be very fast just to fully make the idea of ”action”. You can find the example video at the following address: https://www.youtube.com/watch? v = oqQCivAESmU
 The wall with and without bullet holes
  Tracking points made with adhesive tape
 Create good tracking points
To obtain a good result it is first of all necessary to have prepared some tracking points that are very easy to distinguish, with a clear separation from the background. In fact, if this were not the case, Kdenlive could struggle to correctly recognize the shape of the point and could lose the trace of its movement. The most classic shape for these points is rectangular. The best and fastest way to make them is to use adhesive tape: just attach pieces of colored adhesive tape to the wall (or in any case to the surface on which the holes will appear). The tape must have a light color (for example white), and then we can paint the inside of it with black with an indelible marker, but leaving a clear outline. This contrast will make the points more easily identifiable.
The “textures” of the holes in the wall
We download an image of bullets in a wall and adapt it
 1 THE HOLES OF THE BULLETS – Found a photograph with bullet holes, we must isolate one, so as to obtain a file with only one hole. You must first select the portion of the image that interests us with the selection tool Rectangle .
 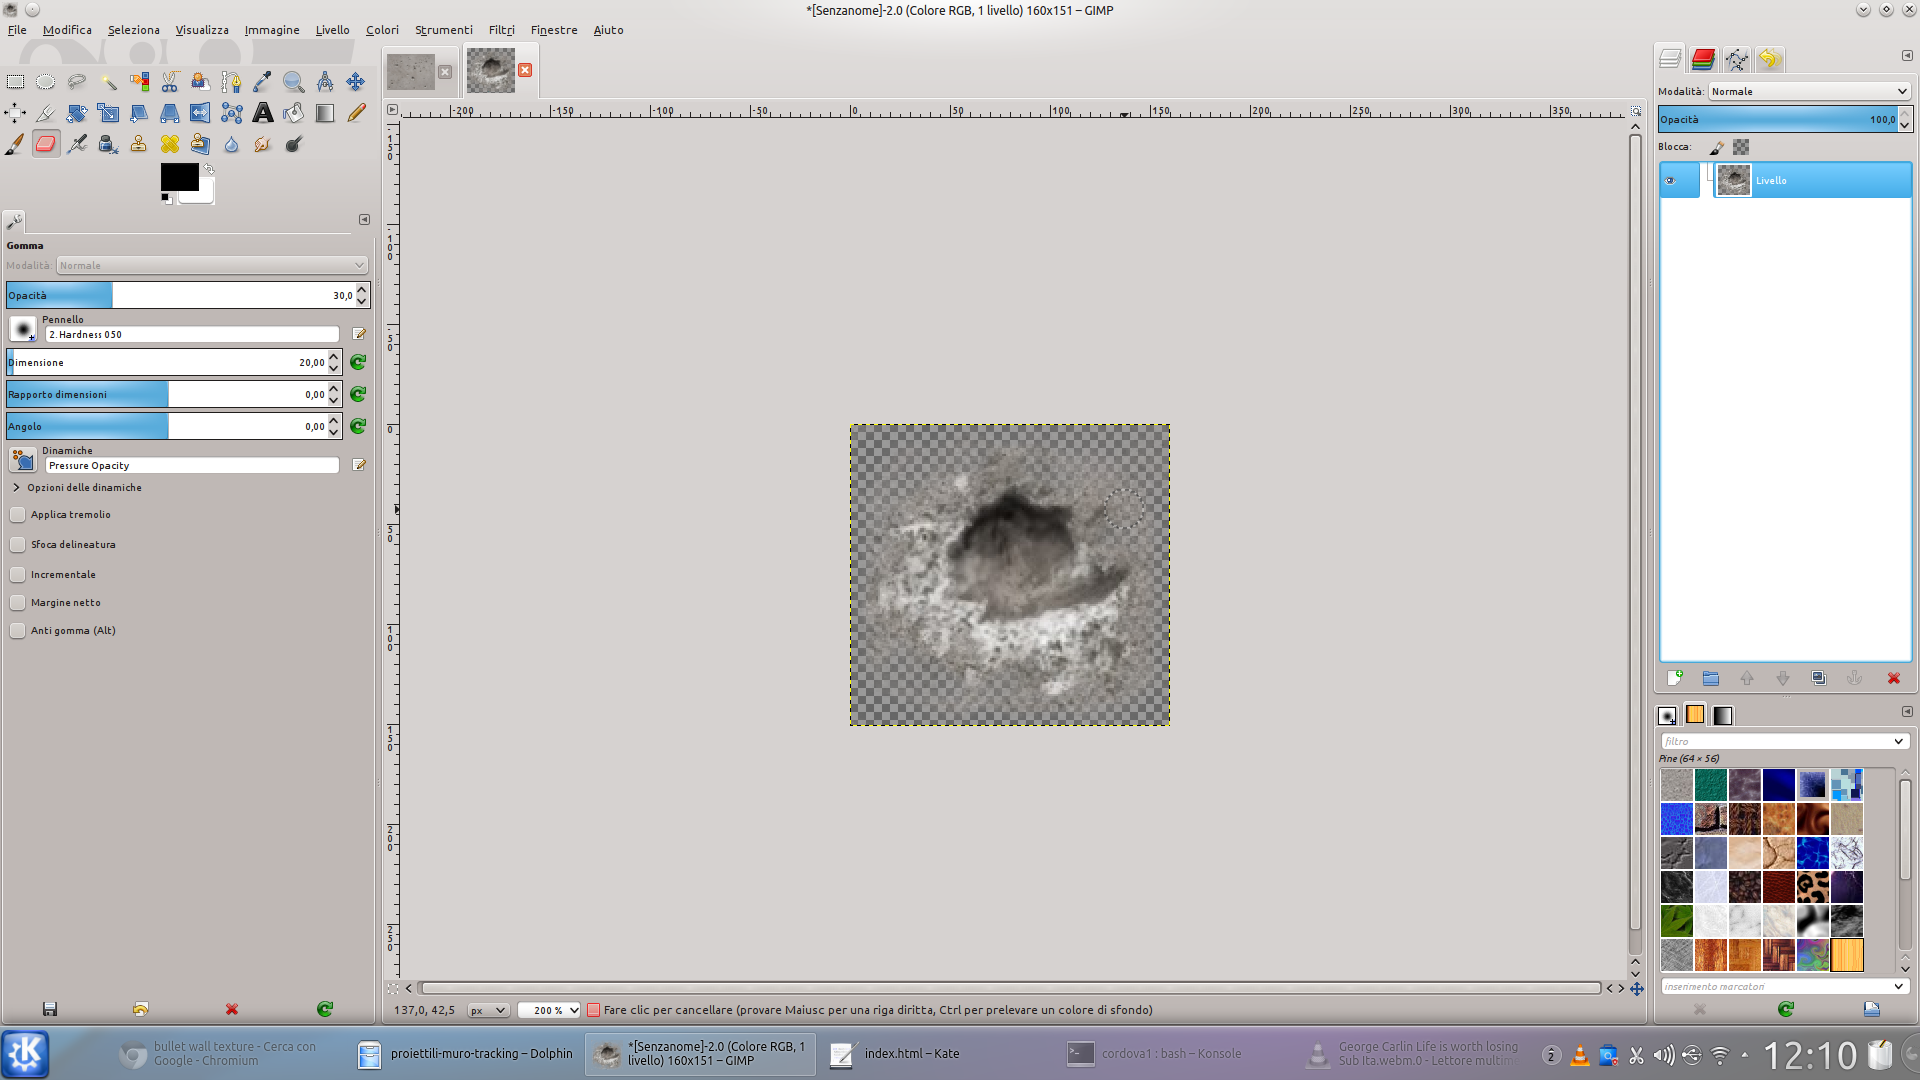 2 TO EACH HIS FILE – Copy the selection ( Edit / Copy ) and create a new image with the same dimensions ( File / New ). In this, we remove the background layer, we paste the selection, and with the rubber to Opacity 30% we delete the edges of the hole.
 Tracking a point in four steps
Following the movement of a point is very simple
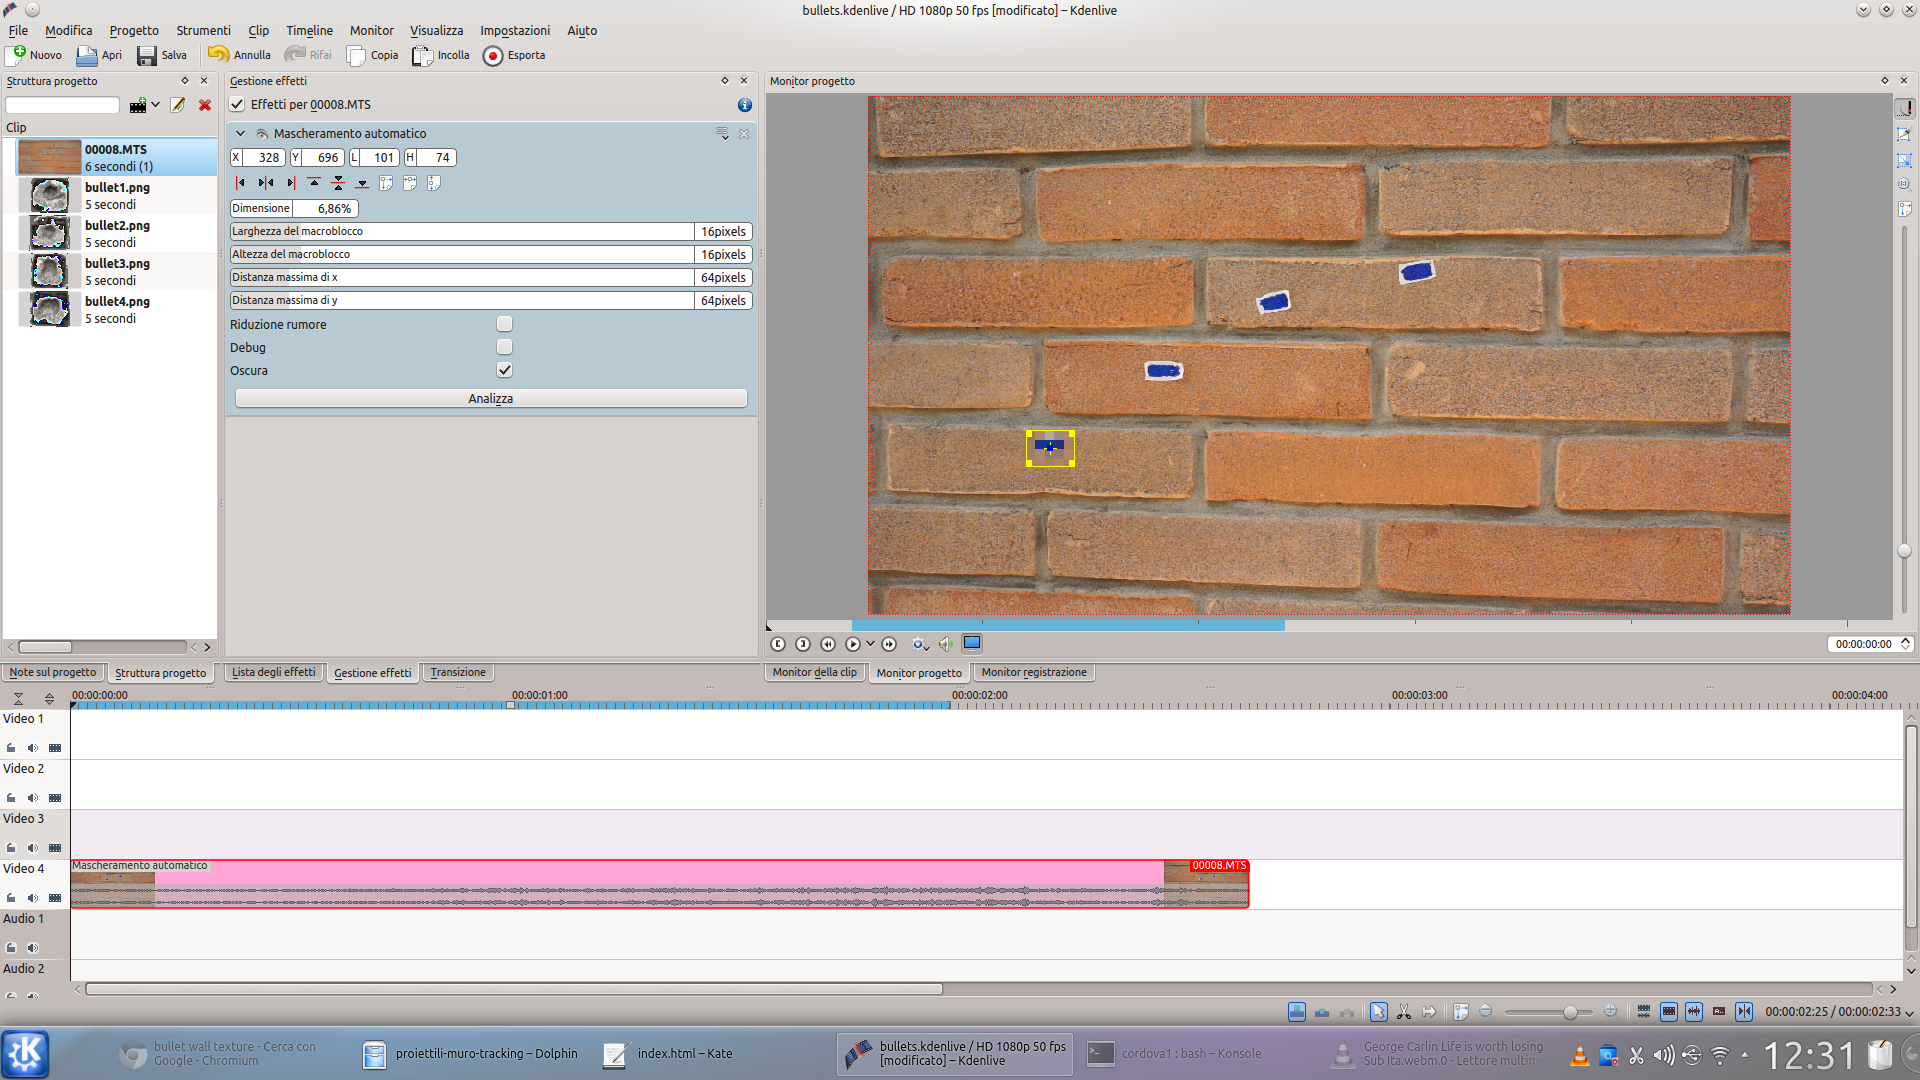 1 VIDEO ANALYSIS – Let’s open Kdenlive and load the clip with the video of the wall into the lower video track. Then we add the effect to the clip Automatic masking , selecting the area of one of the tracking points with the yellow rectangle.
  2 IN COMPOSITION – We press the button Analyze and wait for the procedure to end. Then we load the image of a bullet hole in the video track higher than the current one and apply a transition between the two Composite .
 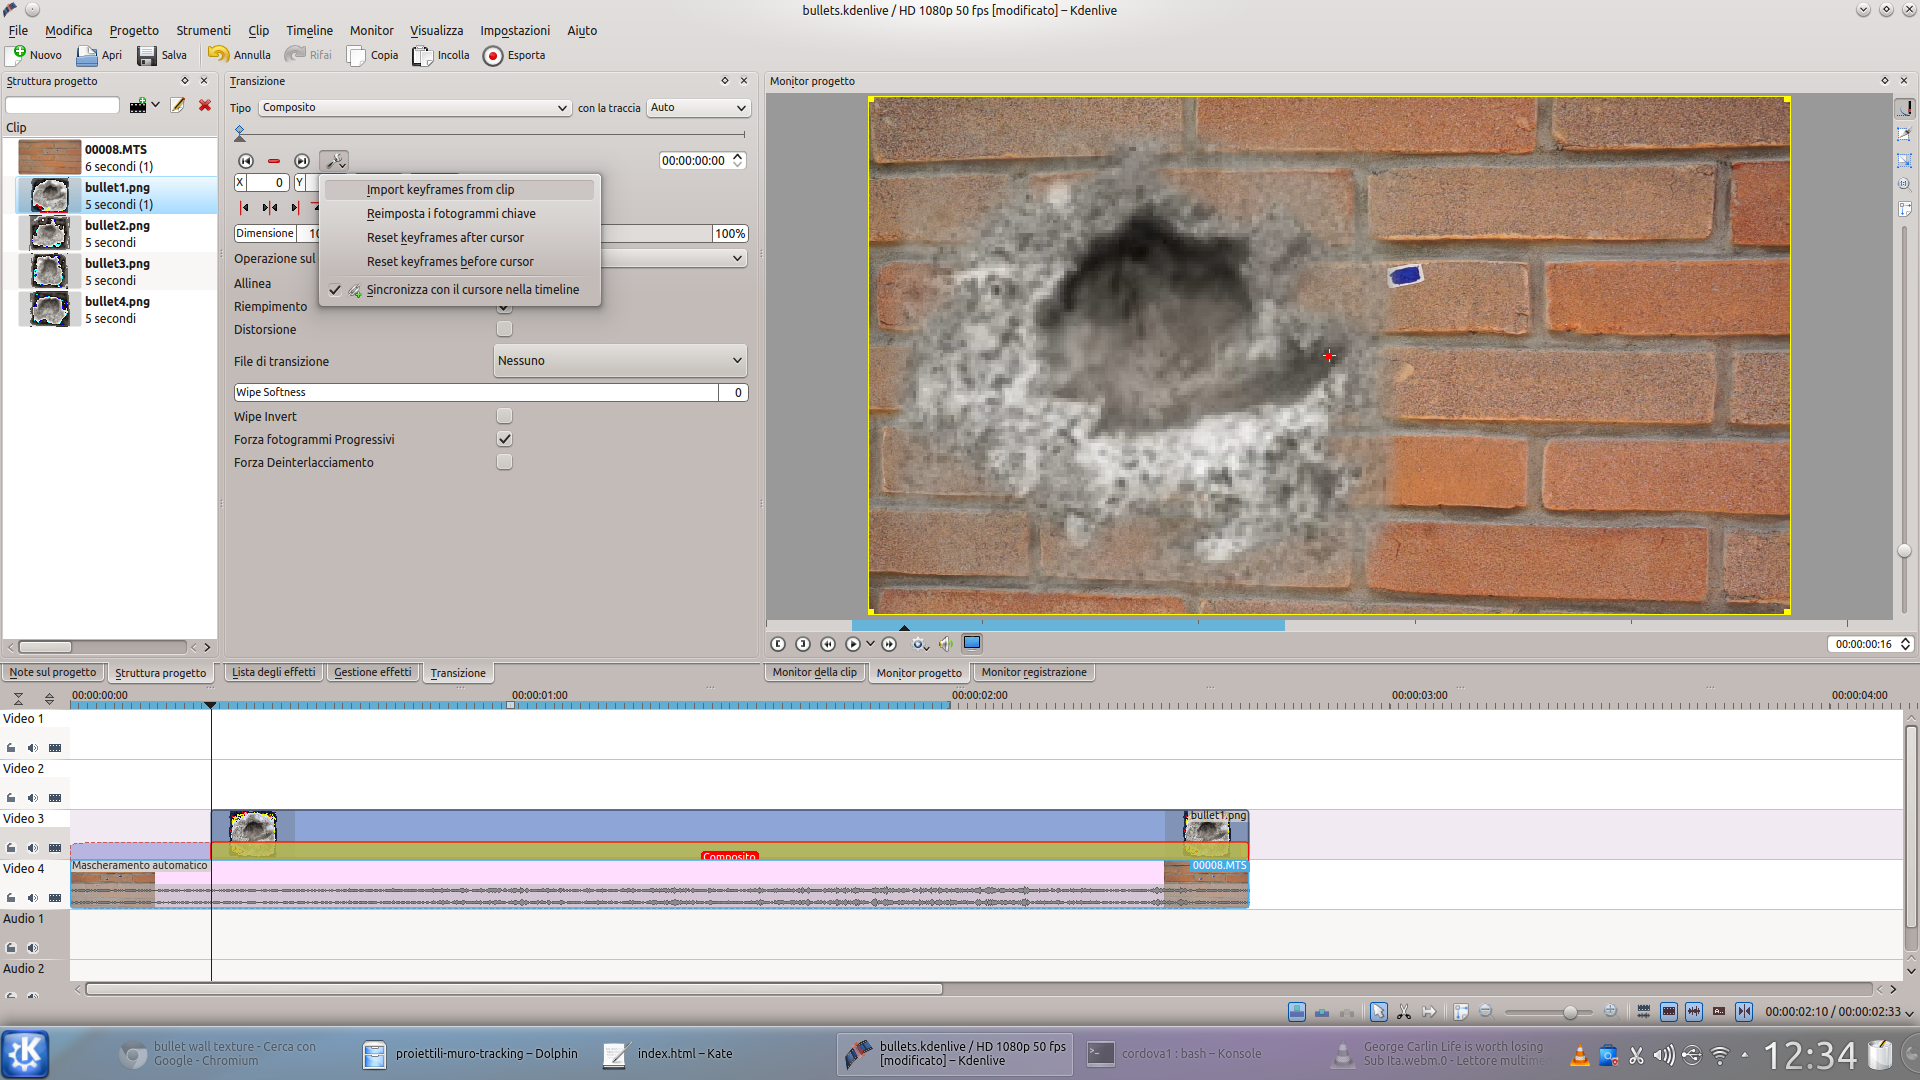 3 IMPORT THE FRAMES – It is important that the bullet hole clip has the same length as the movie. Now we have to set the key frames: just click on the wrench and choose Import keyframes from clip .
  4 PLACE AND DIMENSIONS– The data to be imported will be Motion Vectors , because we only have one point, and we want to clone both the position and the size of the tracking point. Automatically, the key frames needed to move the hole will be created.
 Again, master…
The procedure is the same for all tracking points
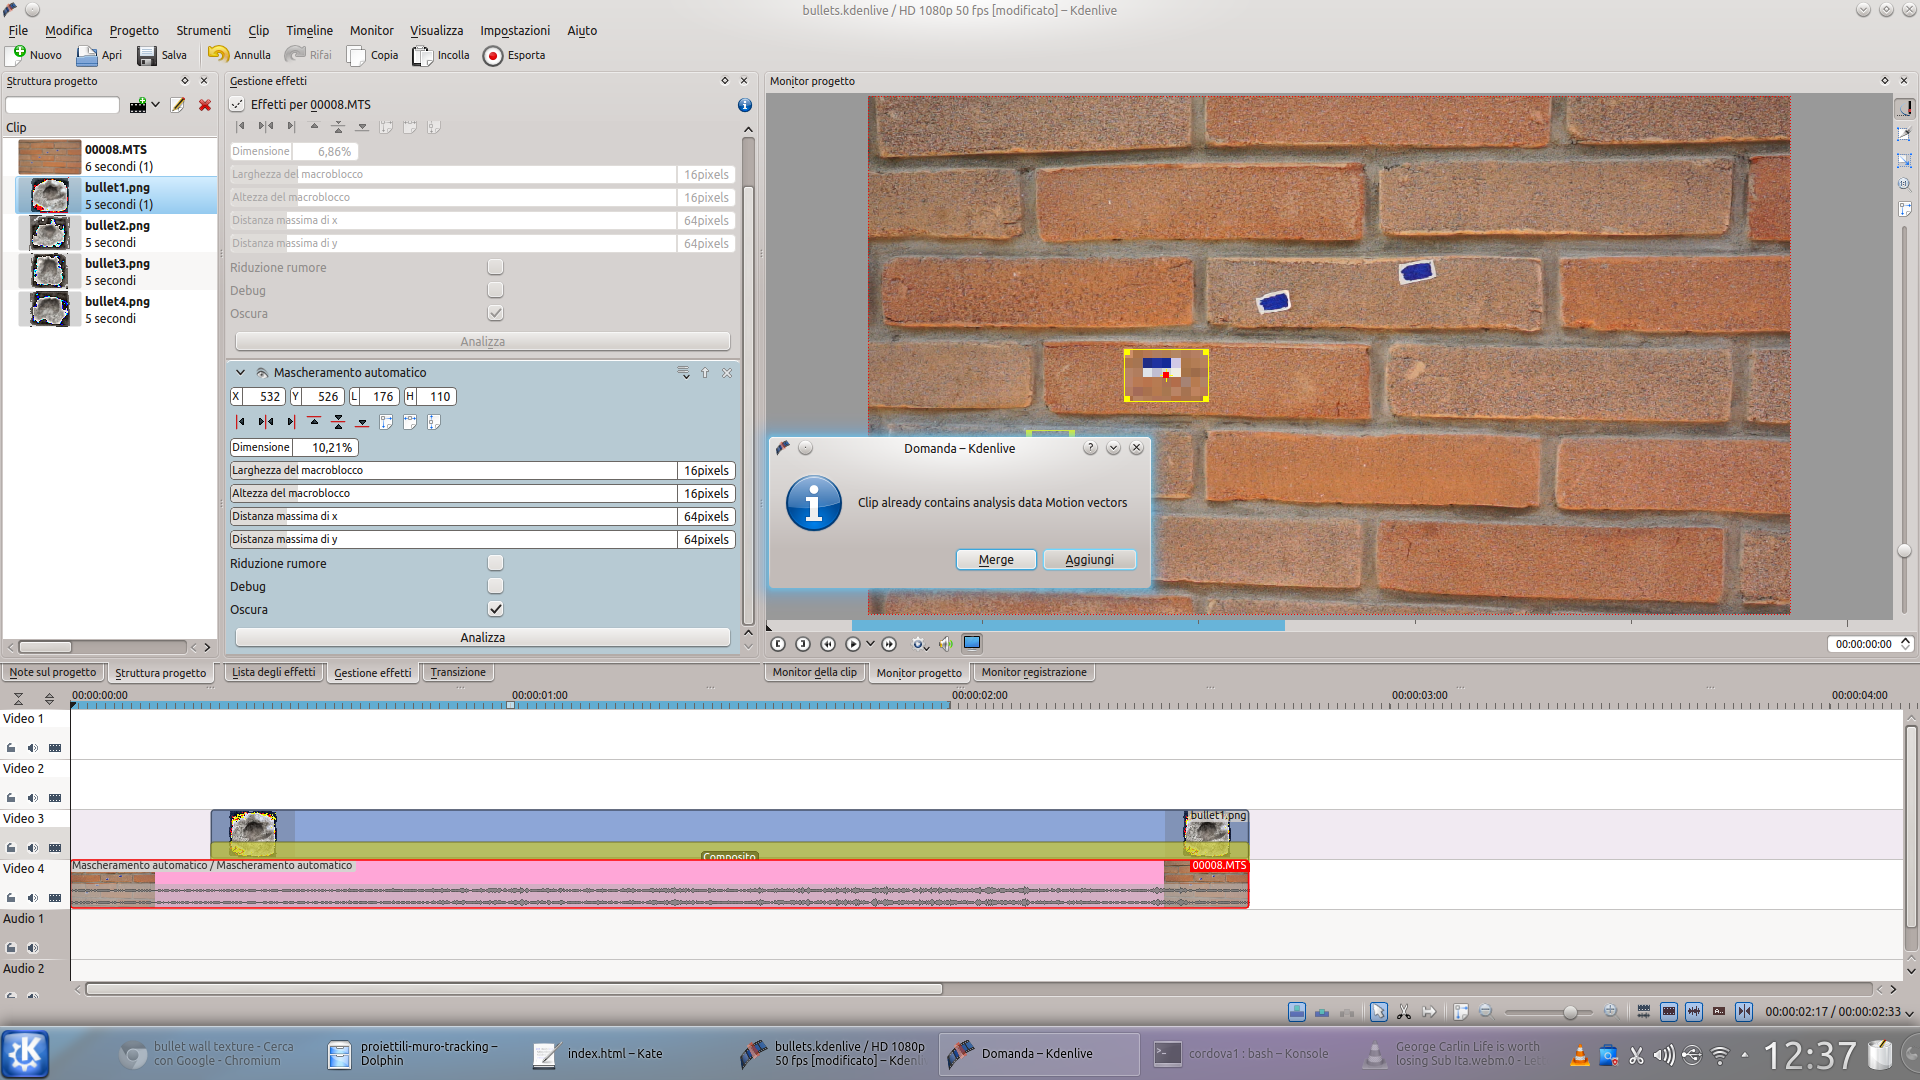 1 THE SECOND SHOOT – We repeat the same procedure for the next tracking point: when performing the analysis of this, Kdenlive will ask us that we want to make new data. We will of course have to choose the option add .
 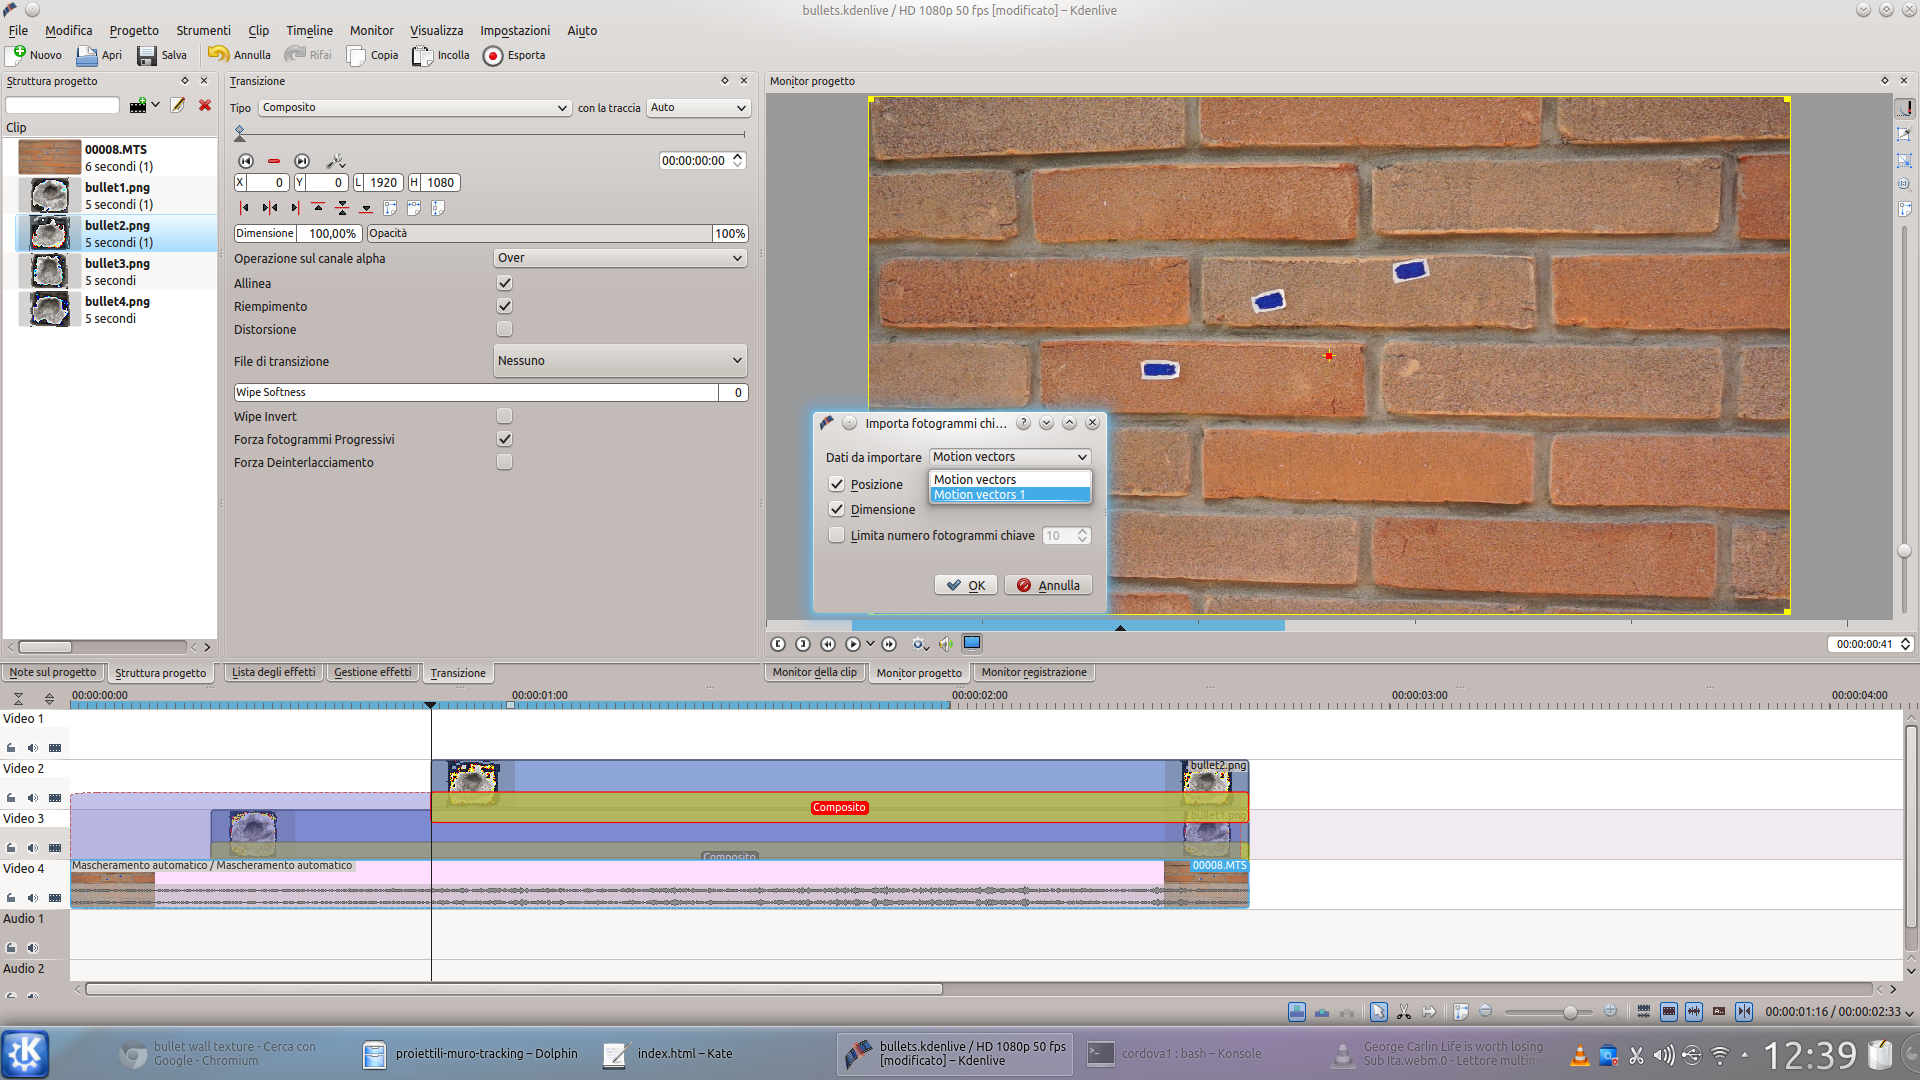 2 A NEW SOURCE – Again we add the hole clip and a transition, but when we set the key frames of the latter it is necessary to choose the source Motion Vectors 1 . This name represents the current tracking point (the next will be 2, then 3, etc…).
  3 NOW WE EXPORT IT – Again, we repeat the same method for all the tracking points that we want to use. It is always important that each image clip has the same length as the video clip. In the end, we export the movie by calling it, for example, ” all-the-bullets “.
  4 AGAIN WITH GIMP – Positioning ourselves on a frame of the video clip and clicking on the gear in the clip monitor, we extract the frame. Then we open this image in GIMP and extract a portion of the wall (which will have to cover the tracking point) and save it in another file.
 The hits that appear “by magic”
Let’s create a “clean” version of the wall and overlap the one with the bullet holes
 1 NEW PROJECT – We must now create a new Kdenlive project, and upload both the original video clip and the portions of the wall cut with GIMP. As before, the video clip must be inserted in the lower track, while the images must be placed on the upper tracks.
  2 A CLEAN WALL – By now we have understood how tracking works: we use the same technique to cover all the tracking points with the portions of the wall cut out with GIMP. Once finished, we also export this project to a video file called, for example “ Wall “.
 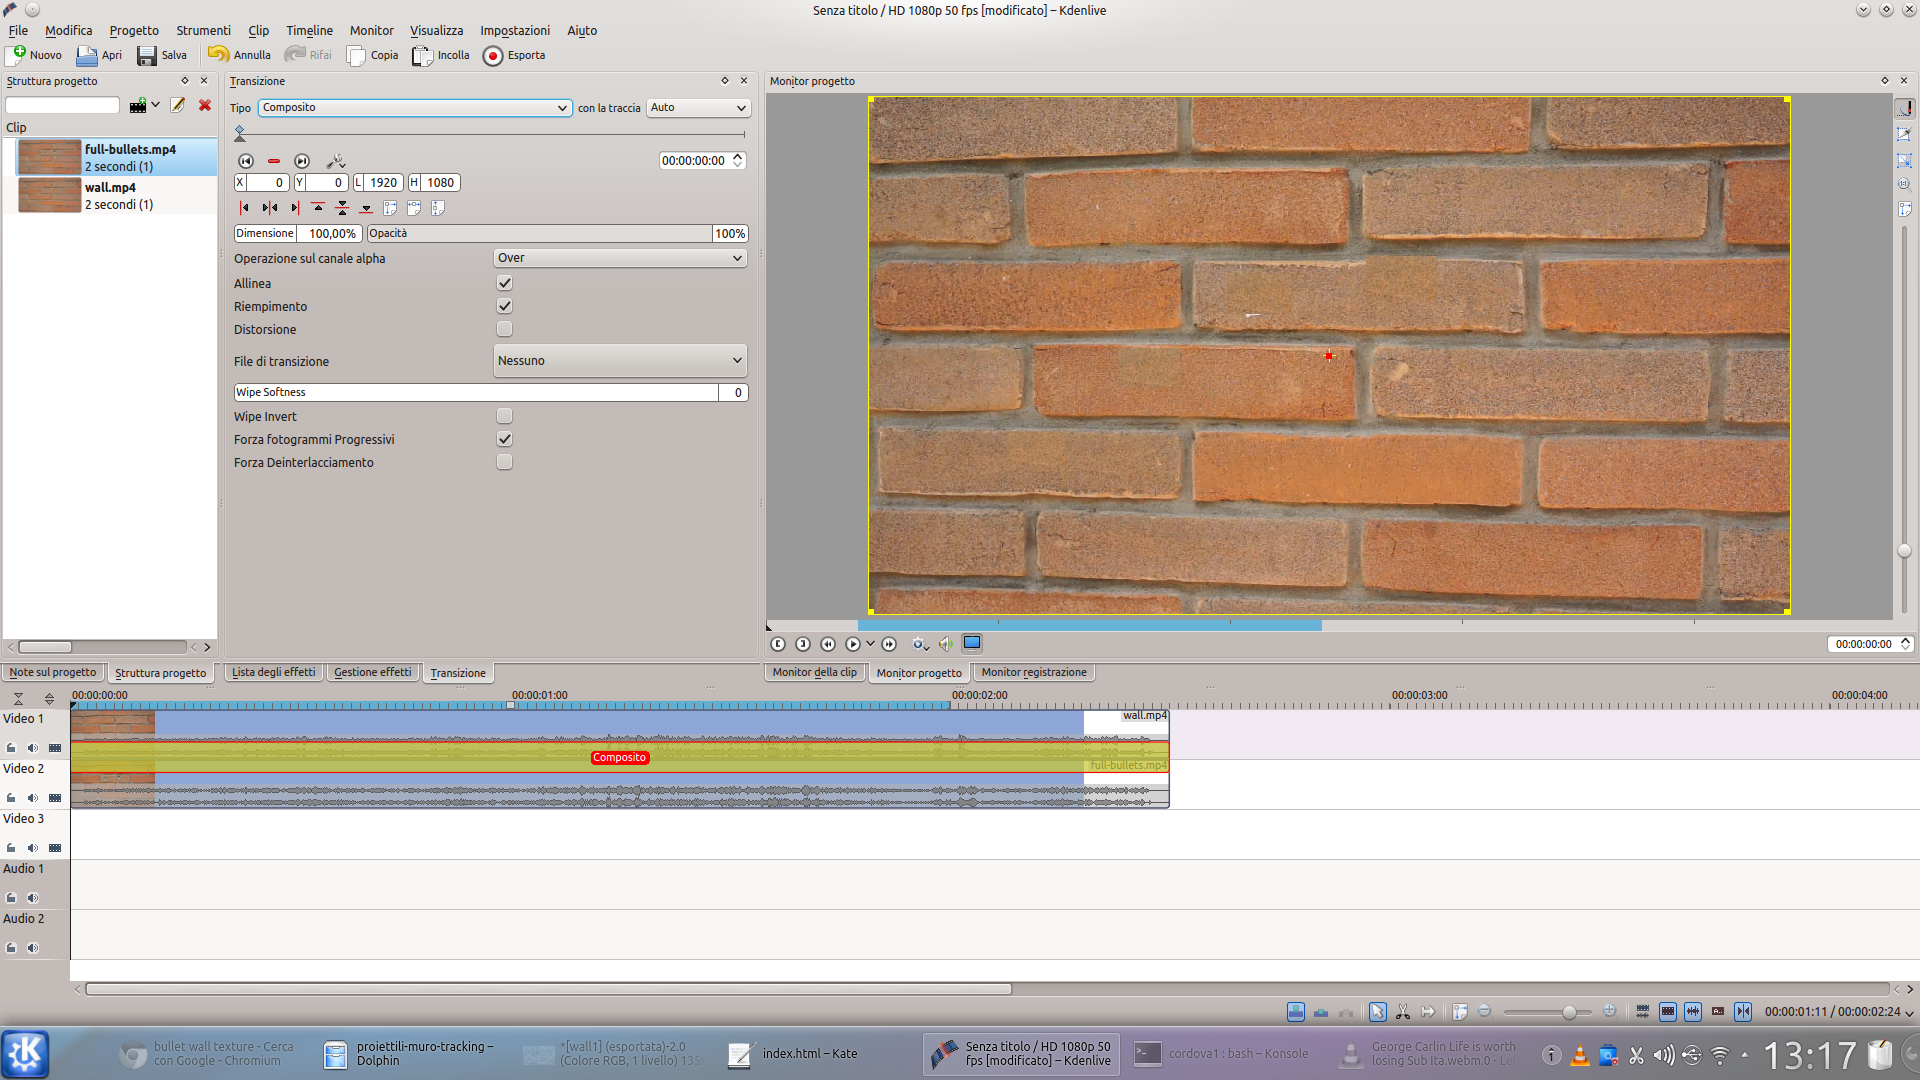 3 THE FINAL VIDEO – We now create a third new Kdenlive project, uploading the videos into it “ all-the-bullets “is ” Wall “. These two must be inserted in the timeline in order to be perfectly superimposed and with a transition Composite .
  4 A ROTOSCOPE – Let’s add the effect to the clip of the upper track rotoscope , so as to hide all the bullet holes. Then we have to move along the timeline and, when we want to fire a shot, we add a key frame with the button + .
  5 WITH TWO FRAMES – Attention, however: after adding this key frame, we must move to the next frame and also add a new keyframe to it. It will be in this seconde that we can modify the effect rotoscope : the former must remain unchanged.
 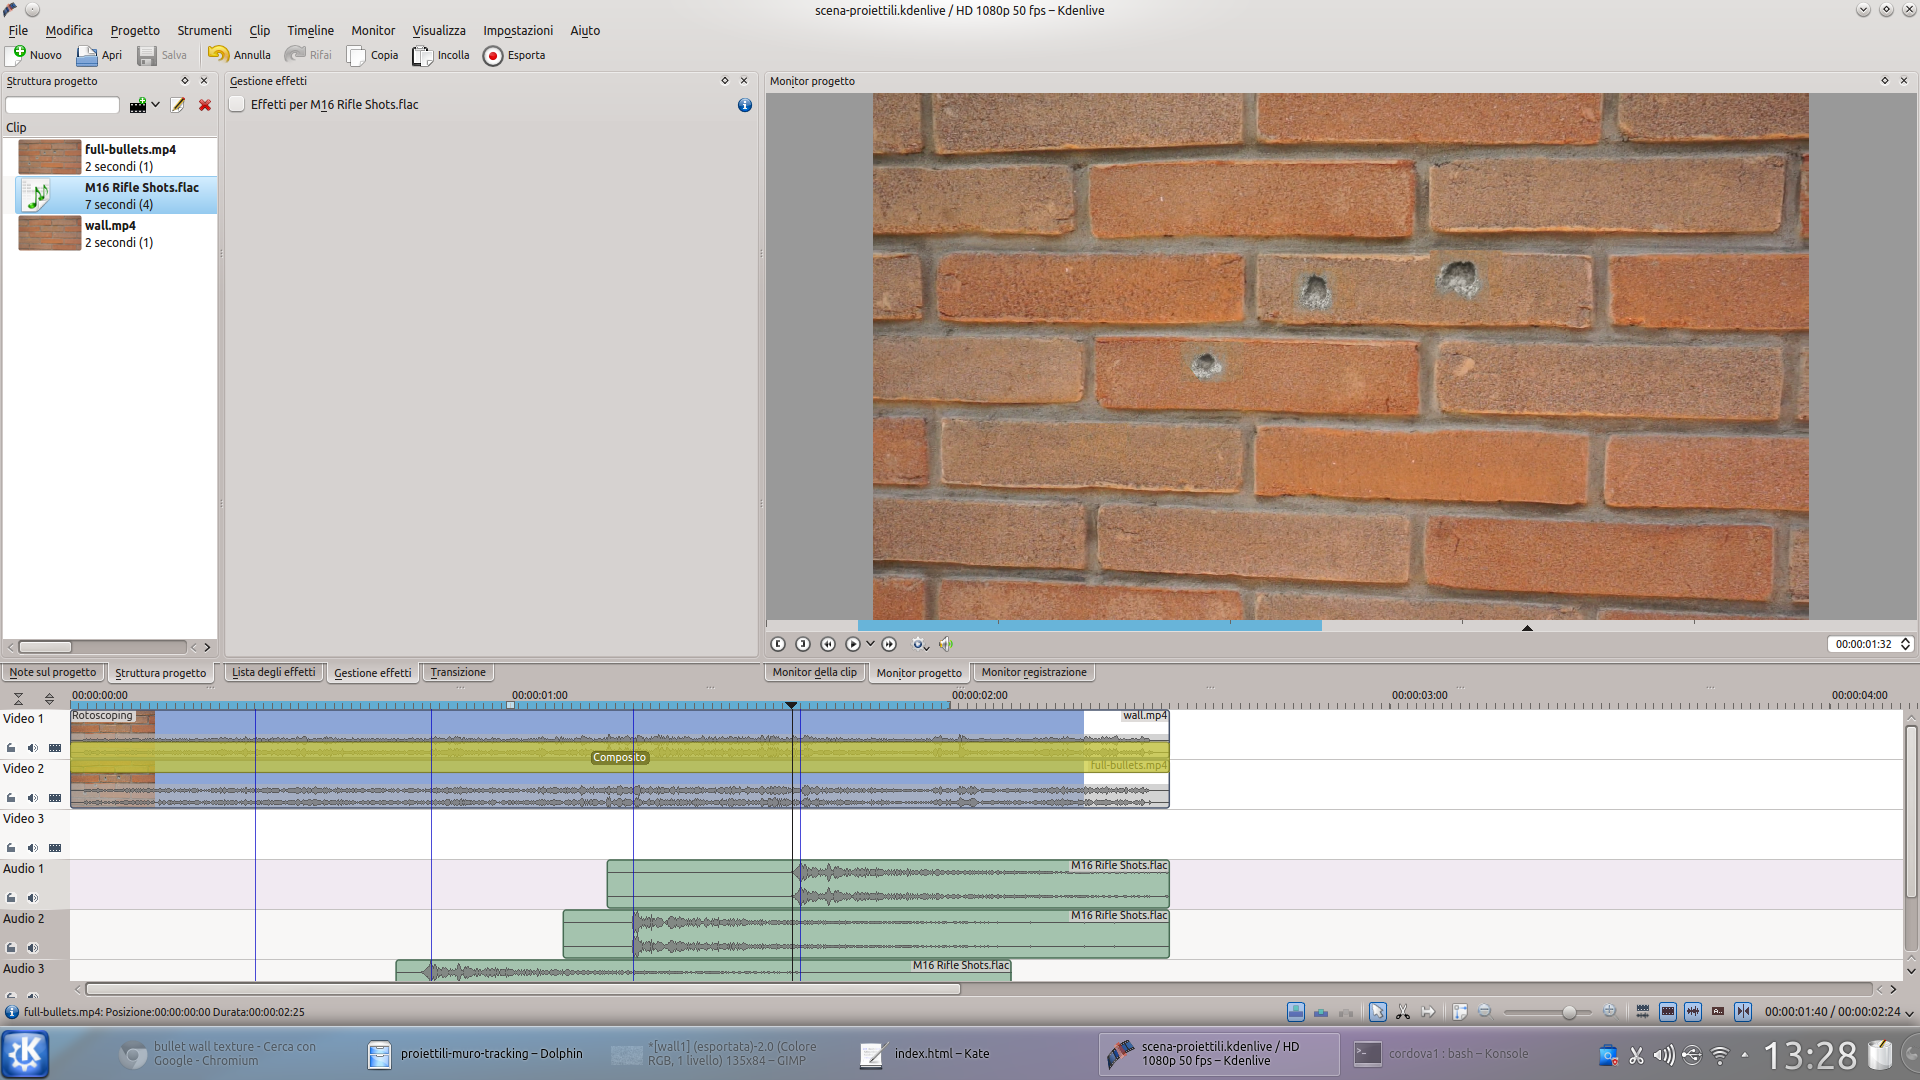 6 THE AUDIO EFFECT – The procedure is the same for the other bullet holes: using two key frames modifying only the second allows a sudden appearance of the hole. Finally, we add the sound effect of a shot in conjunction with the appearance of the holes.

