Have you ever imagined acting within a famous painting, to be used as a landscape in which to move? With Kdenlive you can, taking advantage of the color manipulation functions we will be able to blend a shot with the colors of an ancient painting.
The beauty of a film is that you can do anything, even the absurd and surreal ones, like interacting with imaginary characters. A variant of this topic is the interaction with “impossible” elements such as inanimate objects. For example, can one go inside a painting and have something to do with the subjects or the landscape of the painting? In reality, no, but in cinema, yes, and Kdenlive allows us to achieve this result. The basic idea of the effect is very simple, basically it is a chroma key, which we have already used other times, to cut out our actor from the movie in which we shot it. The technique is simple: a video is shot in which the actor acts in front of a green colored cloth (or any other bright color, such as yellow or blue). The special effect of Kdenlive allows us to make the color of the cloth transparent, thus leaving only the actor visible, which we can position over any other background we want. For example, we can replace the background of the green sheet with the painting in which the actor must enter (for example La Gioconda). But this is not enough: if we simply insert the actor into the picture with a chroma key, its appearance will be very different from that of the other elements of the picture, and will out of tune. In short, the final image will not be credible. We must therefore improve the yield, and to do so we will take advantage of the overlap mode. Just like when overlapping two levels with GIMP, Kdenlive allows you to choose some modes for overlapping the two clips with the transition Composite and transform . The mode that interests us mainly is hard light, or “strong light”. By correctly adjusting the brightness of the video clip we will be able to superimpose it on the painting while maintaining a lighting similar to that of the painting. Furthermore, in the brightest points of the movie it will be possible to see the texture of the painting (for example the knots of the fabric of the canvas, or the cracks in the oil painting). It is important to adjust the brightness of the movie making it dark enough not to let too much glimpse of the background of the picture, otherwise our actor will look like a ghost. This little trick will allow a good fusion of the two images, making the difference between the two less obvious. It is not over, however: there are obviously other differences that need to be ironed out. For example, modern video cameras shoot images with many shades of colors. The palette of a painter, however, usually does not produce more than a few hundred. So we have to reduce the number of colors present in the actor’s movie: to do this we use an effect called “posterize”, because the color reduction operation is called posterization. In addition, you must adjust the white balance so that it is comparable to that of the picture, and turn off the colors a little. When we make a movie, the video camera often tends to saturate the colors a lot, which therefore appear alive, real. However, an ancient painting always has slightly dull colors, because time makes the color dry and takes away the brightness of the painting. So also the saturation of the actor’s footage must be reduced. As always, you can see the example video at the following address: https://www.youtube.com/watch?v=YqLT2aFEhF8
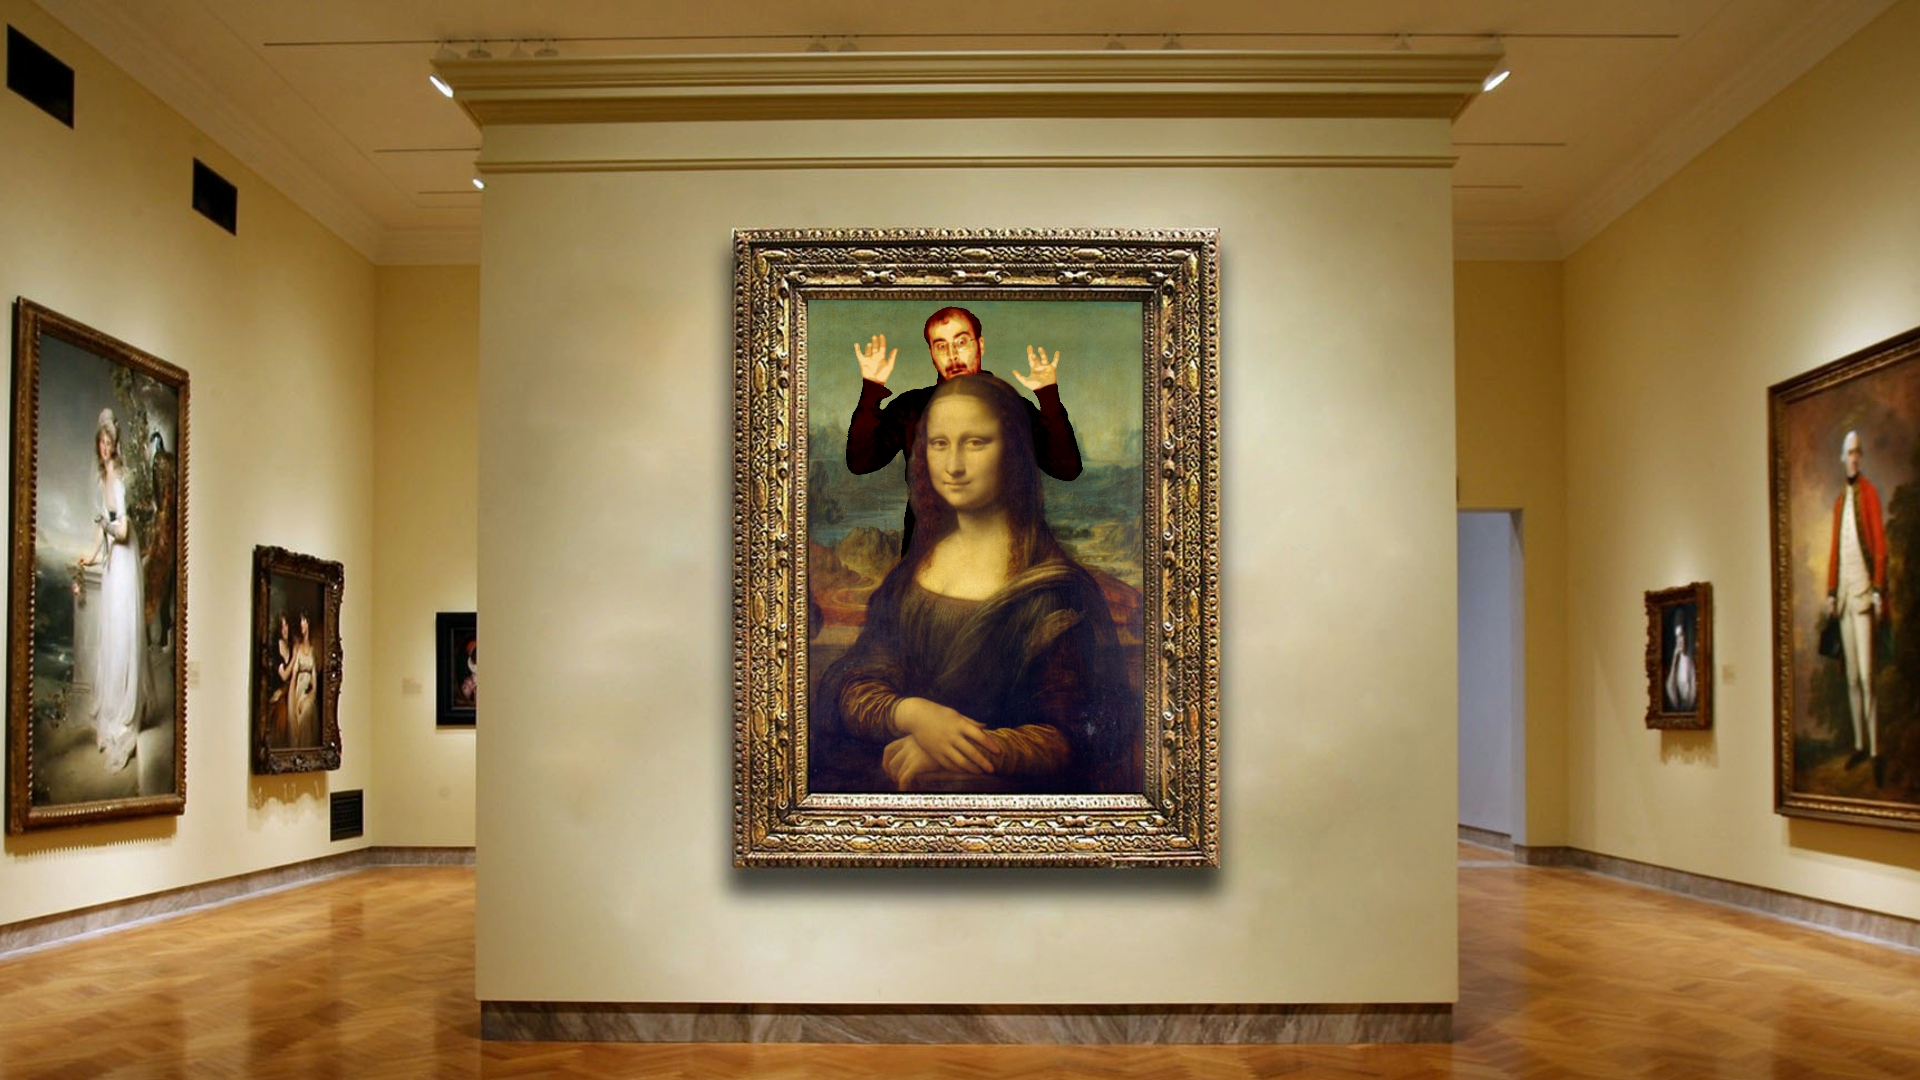 The final effect: the actor is melted within the framework
  Only the chroma key, without the hard light, offers completely wrong colors
 Make the effect credible
This type of sequences requires a wide angle lens, so that the perspective lines are very elongated and the movement of the camera can be easily felt. Obviously, the lens used in the first room should be the same as the second, since in theory it is always the same video camera that passes through the wall. In the example movie, you can see how the animation is much more credible in the first room than in the second. This is because in the first room the camera was positioned closer to the wall. To improve realism, you should try to bring the camera closer to the wall as much as possible: this allows you to reduce the extent of the perspective change to be made in post production. In postproduction it is important to set a wall size (the space between the two clips in the tutorial is 50 points) consistent with the objective that was used: the wall must not seem too large or too thin.
A museum wall
We prepare the image of the picture hanging on a wall
 1 NEW IMAGE – To begin with we need to prepare the painting: open GIMP and create a new image the size of our movie (for example 1920×1080 points). In it we will insert both the chosen painting and an image of a wall with File / Open as Layers .
  2 LIKE A WALL – The painting should be placed on the wall, so as to give the illusion that the image is real. The image must be exported in PNG format. If you want to keep some parts in the foreground, such as the protagonist of the painting, you will have to make a copy in which the background is deleted.
 Extract only the actor from the movie
We use chroma key and rotoscoping to hide everything that is not the actor from the movie
 1 WITH THE BACKGROUND? – By taking advantage of the levels of GIMP, portions of the picture can be separated using the Lasso selection . Then you can make a layer invisible (like the background of the painting) by clicking on the eye-shaped button, and export the image in PNG format.
 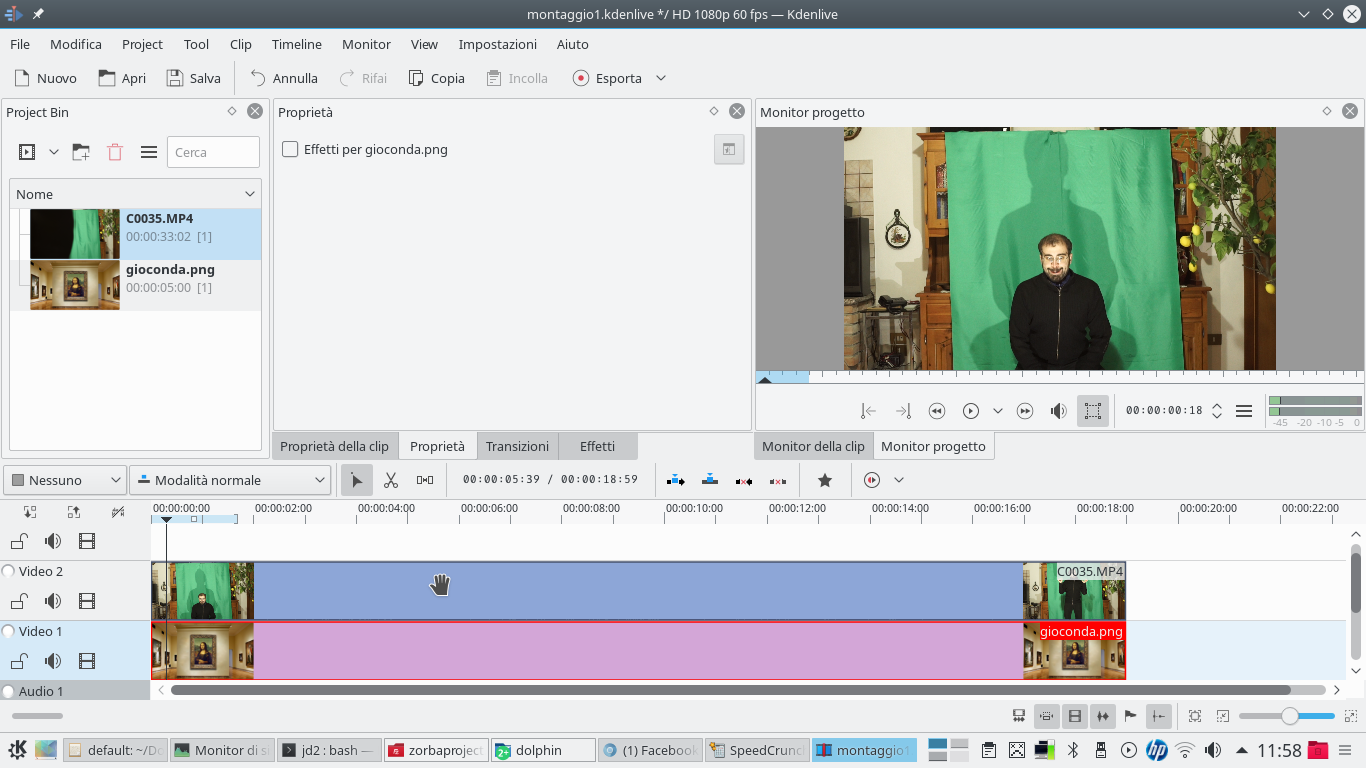 2 TWO INITIAL CLIPS – Open Kdenlive, we insert the clip containing the painting (complete with a background) in the track Video1 and the one with the movie shot on the green background in the track Video2 . The image must have the same duration as the movie.
  3 A TRANSITION – A transition of type must be inserted between the two clips Composite and transform . The transition allows us to position and resize the movie in order to allow the actor to enter the picture.
  4 CHROMATIC KEY – Before moving the movie clip using the transition, let’s insert a type effect into that clip Chromatic key . By selecting the background color on which the actor is located, we will make it transparent.
 Inside the painting
Let’s make sure that the actor is positioned correctly to stay inside the painting
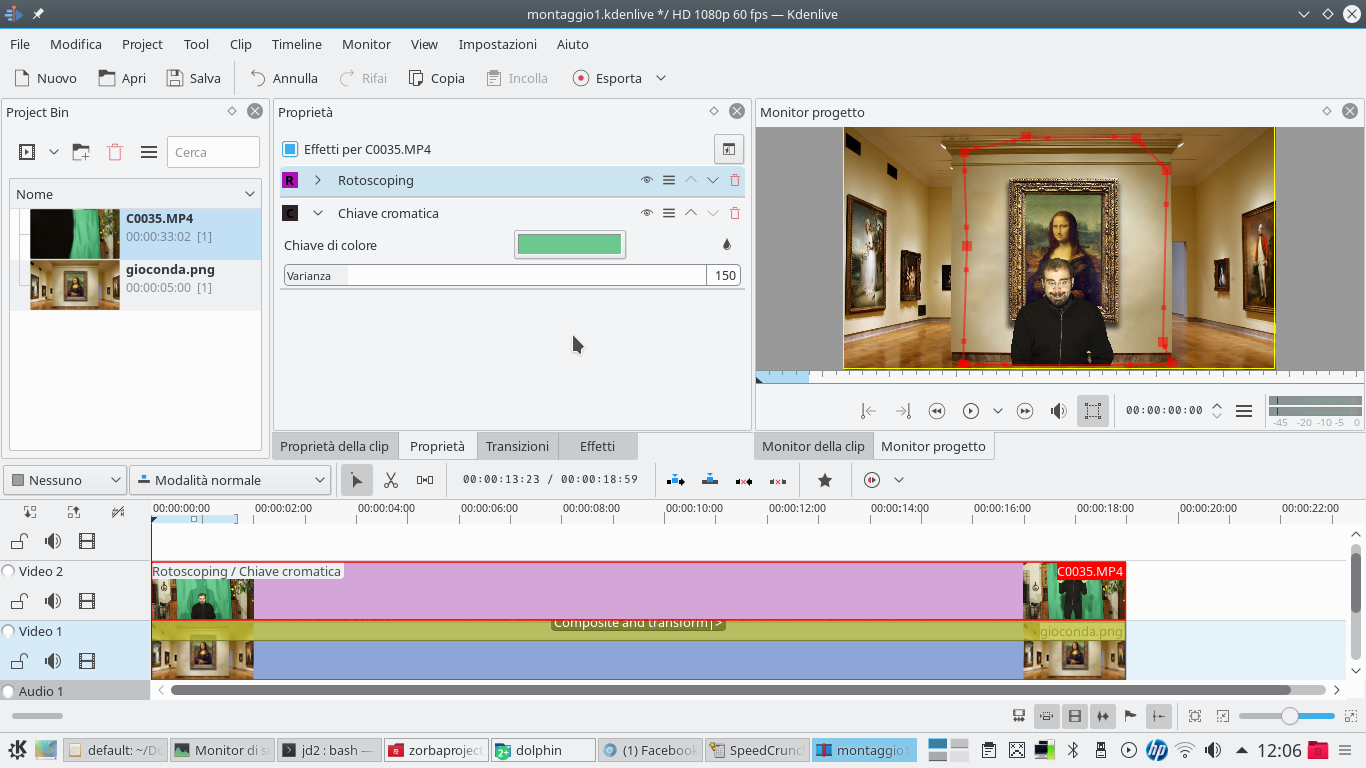 1 THE ROTOSCOPE – In the same clip you must now add a type effect rotoscoping . With this effect we draw the outline of the area that must be shown, that is, keeping the background of the movie out of the polygon drawn (everything that is outside the green sheet).
  2 THE POSITION – The effect rotoscoping it must be positioned, in the list of effects of the video clip, above the Chromatic key . Going back to the transition Composite and transform , we can now correctly position the video inside the picture.
 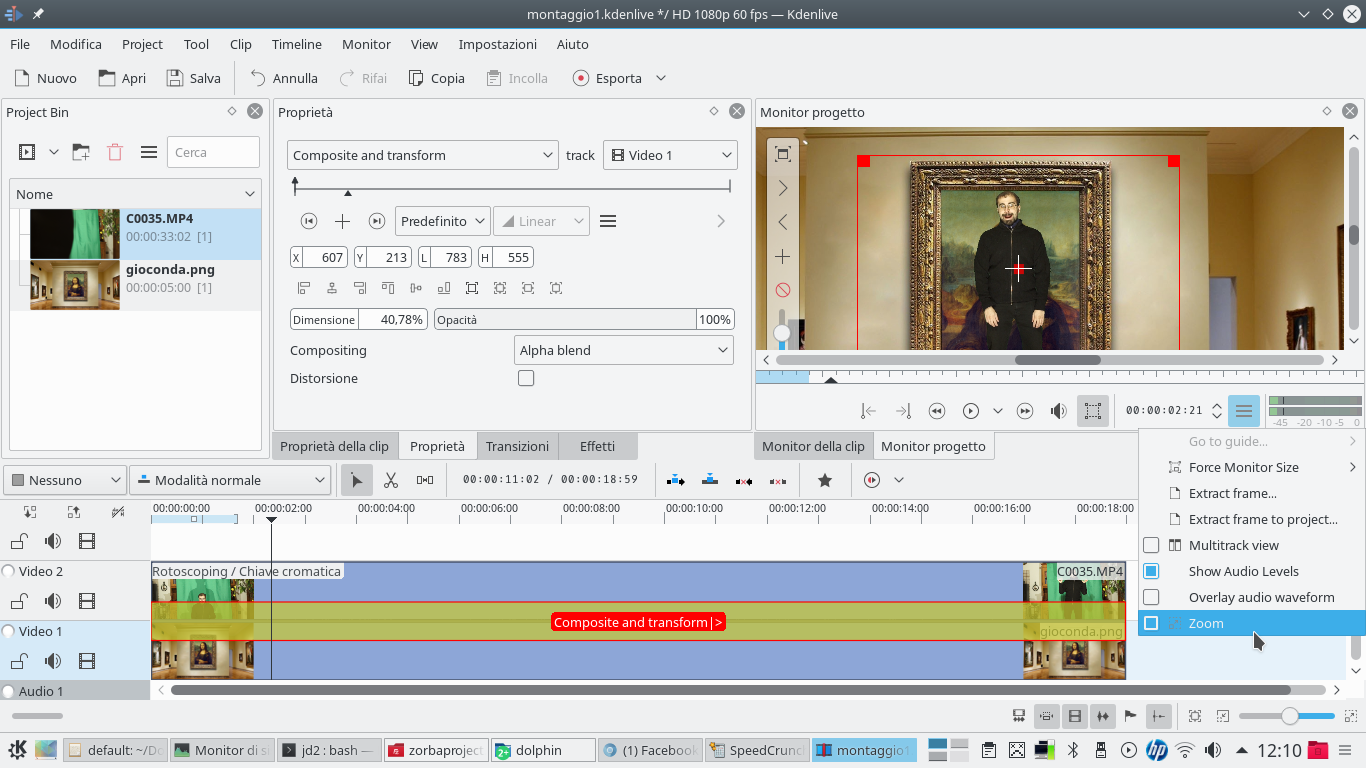 3 WITH THE ZOOM – To facilitate correct positioning, we can click on the menu Project Monitor and choose the item Zoom , so that you can increase the zoom of the preview. You can also send the preview in full screen.
  4 IN THE SPOTLIGHT – If necessary, we insert in the track Movie3 the clip containing the picture of the painting without the background, that is, only with the parts that must be in front of the actor. We will insert a transition Composite referred to the track Video1 .
 A perfect fusion
We make the image of the actor similar to that of the painting, to merge them most likely
 1 STRONG LIGHT MODE – Let’s go back, now on the transition Composite and transform , the one between the clips Video2 is Video1 . The advantage of this transition is that you can indicate the method of compositing , which in fact must be Hard light .
 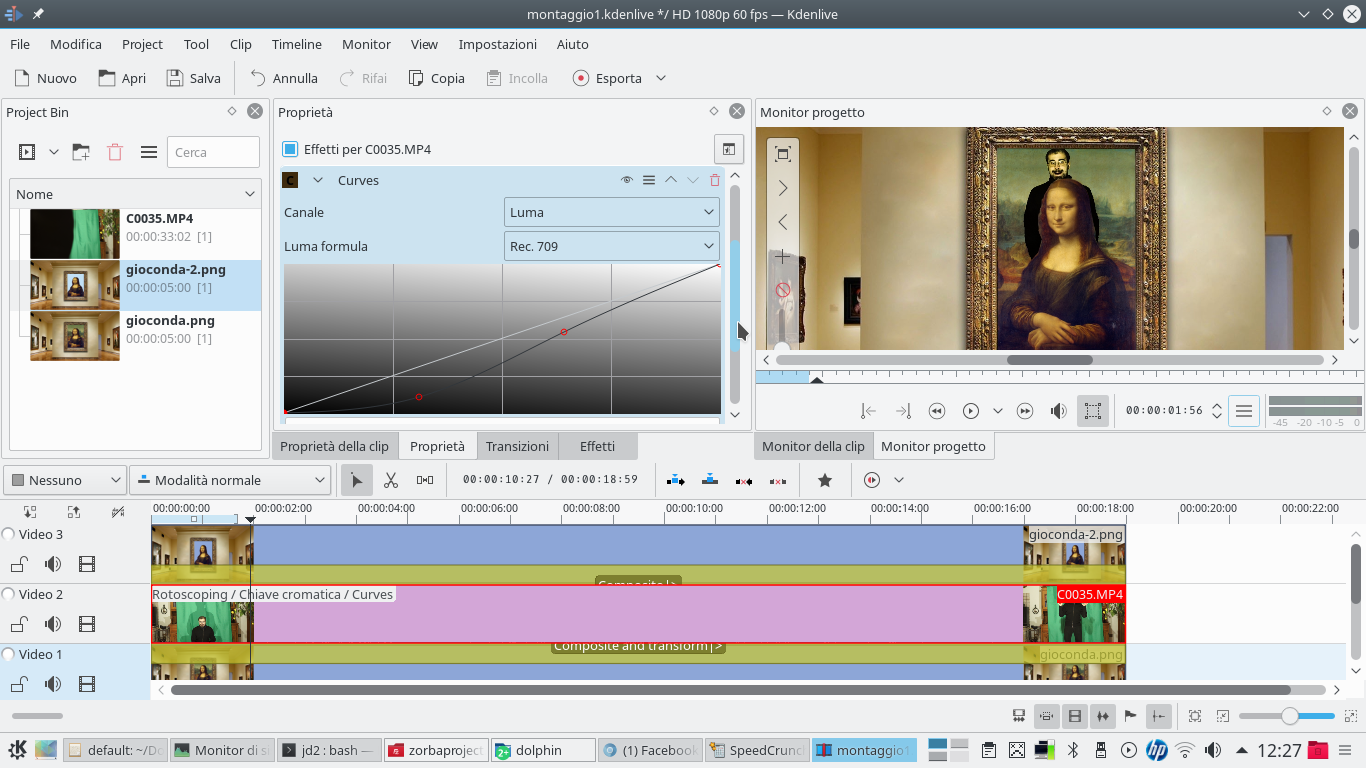 2 THE BRIGHTNESS – Thanks to Hard light , the actor’s movie takes a part of light and the “texture” of the picture, blending the two images well. To correct the brightness we add an effect Curves On the canal Luma , lowering the shadows a lot.
 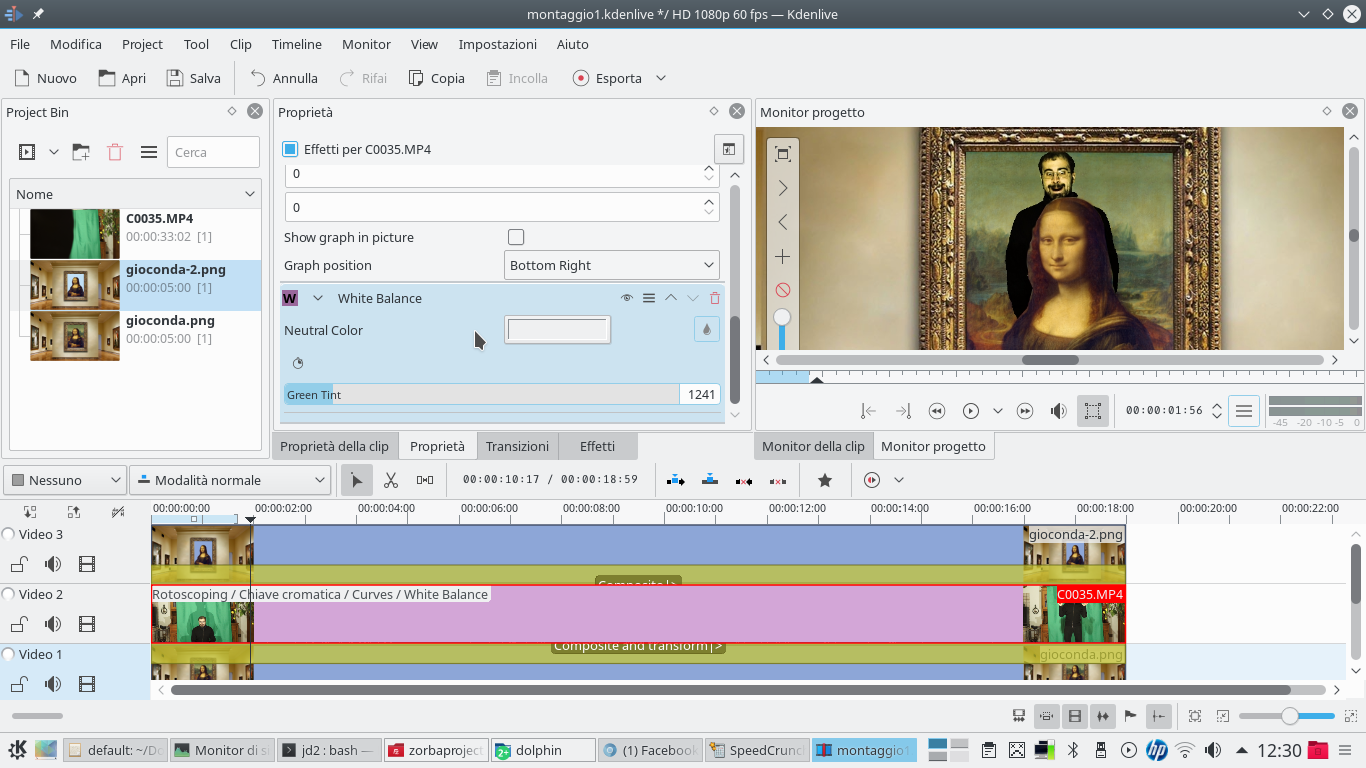 3 BALANCING – The white balance of the clip must be made similar to that of the picture, so we must add an effect to the movie White balance and adjust it by eye. If you want you can also do the opposite, i.e. add the effect to the painting to make it similar to the movie.
  4 LESS COLORS – A painting certainly has less color tones than a modern video camera: we add an effect to the actor’s clip Posterize , to reduce color shades. Just decrease the value levels without exaggerating.
  5 A BLUR – Clearly, now the actor has edges that are too sharp to be a painting, so we will apply an effect on his clip Blur . The type of blur must be Gaussian , and the amount must be set by eye to obtain the same contours of the painting.
  6 COLORS OFF – Finally, you can also reduce the saturation a little, to make the actor’s colors a little more dull. After all, a 500-year-old painting will have slightly dull colors. Of course, the effect Saturation it should be used to decrease saturation only slightly.

